Part 1: Setting it Up
To kick off our series on How to Clone ANY Online Store, we are going to walk you through creating the bones for our Online Store. We will install and configure WooCommerce, then configure WordPress and Divi. To wrap things up, we will then create some global styles which is a great practice for any new project to save on time and keep things consistent.
Ah the thrill, you just landed a new client, there is excitement in the air and dollar signs in the eyeballs…BUT. You start discovery with said new client has some ideas and things start to sound complicated. They love the shopping experience on the Abercrombie & Fitch online store and shoot off the hip with “Yeah, build me Abercrombie & Fitch”. Hmmmk you think, this will cost their weight in gold, right? Nope!
In this series we will show you how to build sites that very closely resemble that of any brand, or maybe you are prospecting client that already have Shopify or Squarespace sites, but need a solution that has more of a bespoke feel. We’ll show you how to do that as you go through the series and build, wait for it, Divi Engine & Fitch.
Video Tutorial
Table of Contents
Difficulty
Intermediate
Time
45 Minutes
Installing WooCommerce
If you’re here, I’m pretty sure you’ve installed a WordPress plugin or two in your life, but just so we all are on the same page, let’s install WooCommerce really quick.
Make sure you are logged in to an administrator account for the backend of your Divi install.
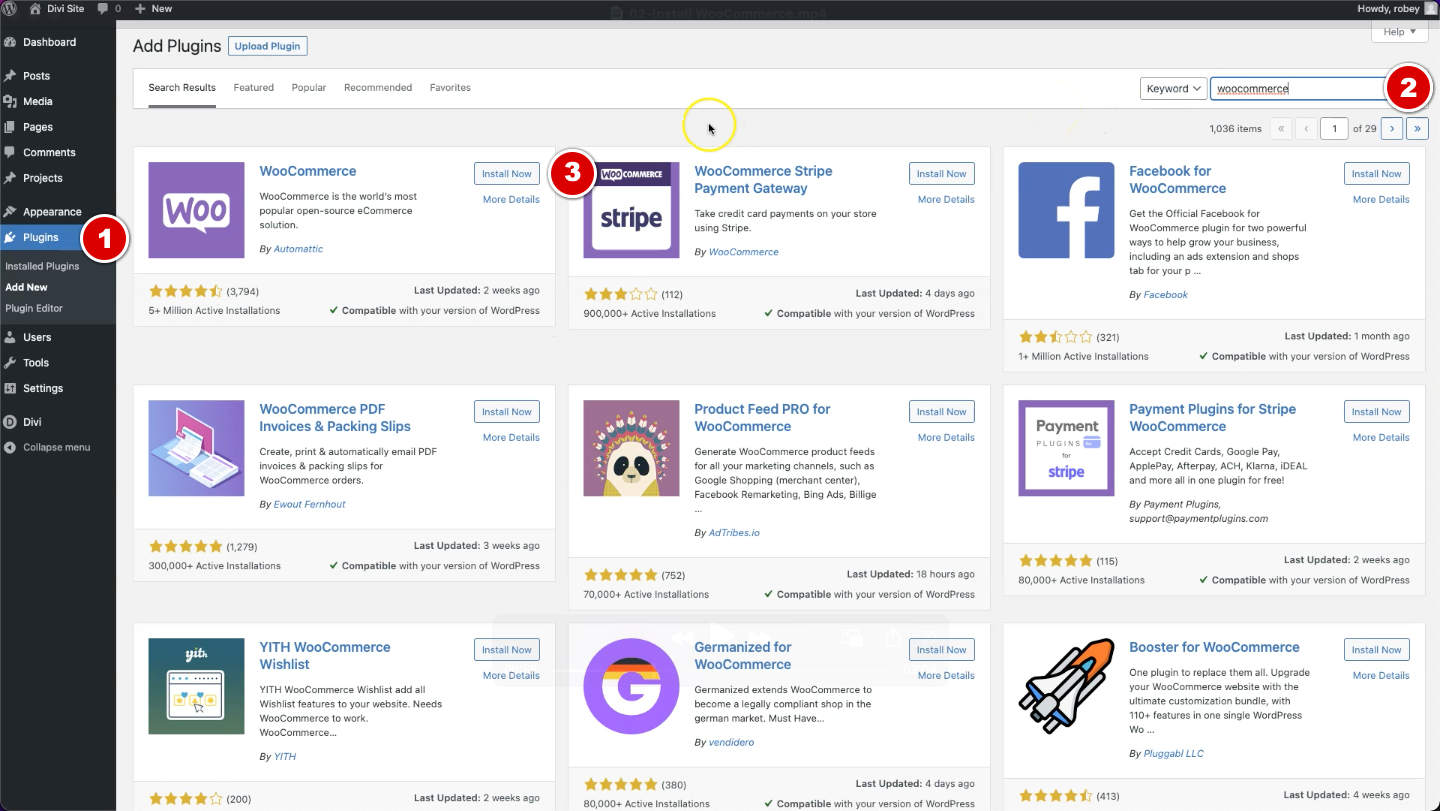
Head to Plugins > Add New > Then search WooCommerce
Install WooCommerce
Activate WooCommerce
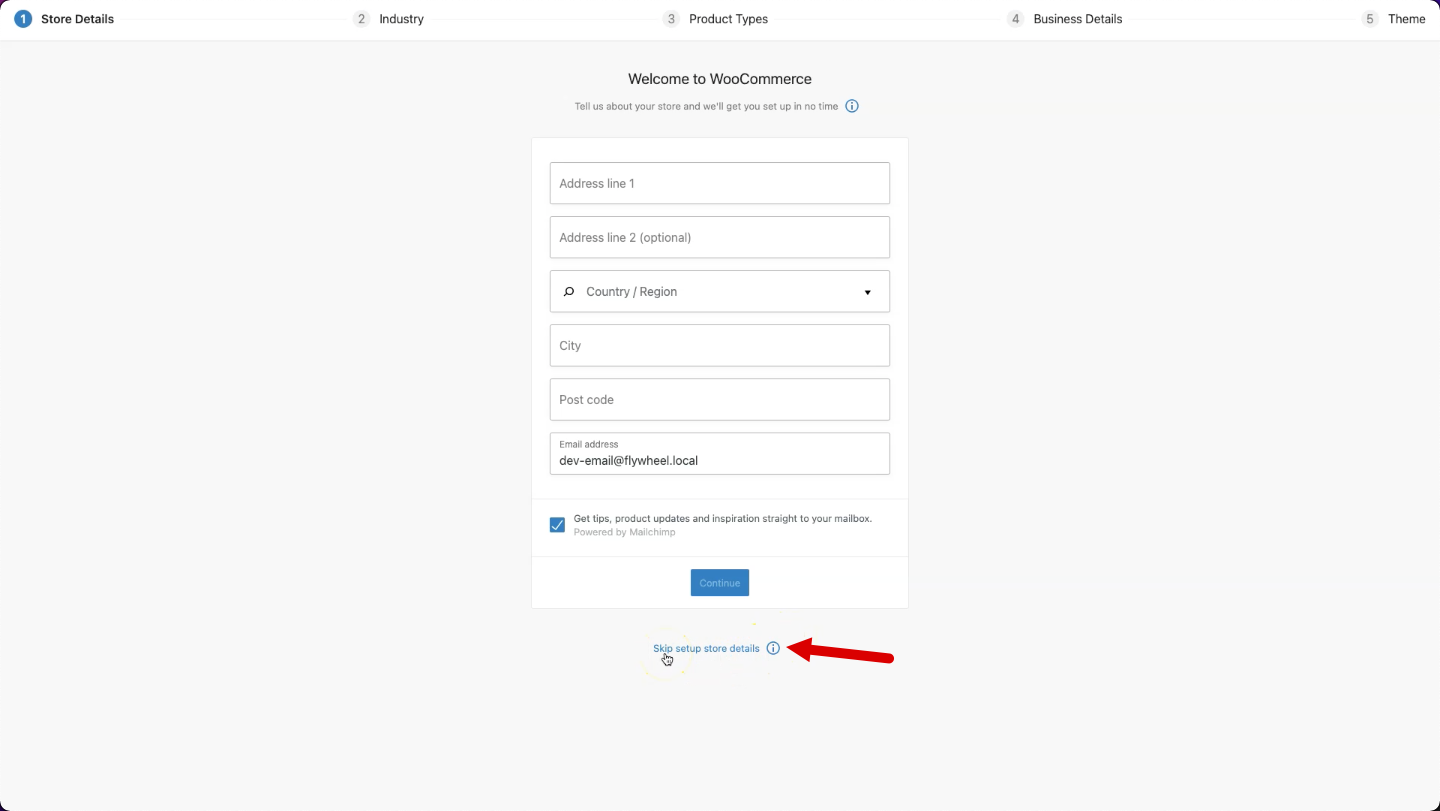
Now once WooCommerce is installed and activated it will launch the setup wizard. We will skip it by clicking the “Skip store setup details” link at the bottom as we will set all this up in a later step.
Import Sample Products
If you already have some products in mind that you want to add to your site, this step might not apply to you, but having some products in your WooCommerce database is essential for the design stages of your site. I’ve often been in the situation with clients where contracts are signed and milestones have been set, but they struggle to get their product data to you for reasons ranging from waiting on product images to their sick cat, but we can’t let this delay our development process. Enter sample or dummy products.
This enables us to continue working on our site design by having some frame for reference on how things like product and store pages will look once the final products arrive from MR or MRS tardy client. 😂
WooCommerce comes with a sample product CSV file, but we found it lacking a few things, so we made our very own. You can check out the post with our FREE WooCommerce Sample Products CSV File and download it there, or just click the button below.
Now that you have your CSV file, importing it is super easy and we wrote a whole tutorial on Importing WooCommerce Sample Data, so check that out. All you would need to do differently is use the CSV file you just downloaded instead of hunting down the one included in WooCommerce.
If video is more your style, we walk you through the process in the clip below.
Configure WooCommerce
With products in our WooCommerce store, we can now go and configure it so that when we start testing our checkout process, things run smoothly and as we expect with the right options for things such as shipping and payment options.
We are going to configure our Physical Address, Shipping Options, Payment Options, Account Creation, My Account Section, Product Categories, and Product Attributes. Let’s go!
Physical Address & General Details
First, we will configure our address as well as some general settings like what countries we do business with as well as what currency we do business in. We can also handle tax calculation from here, but we will cover that at a later stage in this series because WooCommerce can conveniently handle that important piece on our behalf.
Make sure you are logged in to an administrator account for the backend of your Divi install.
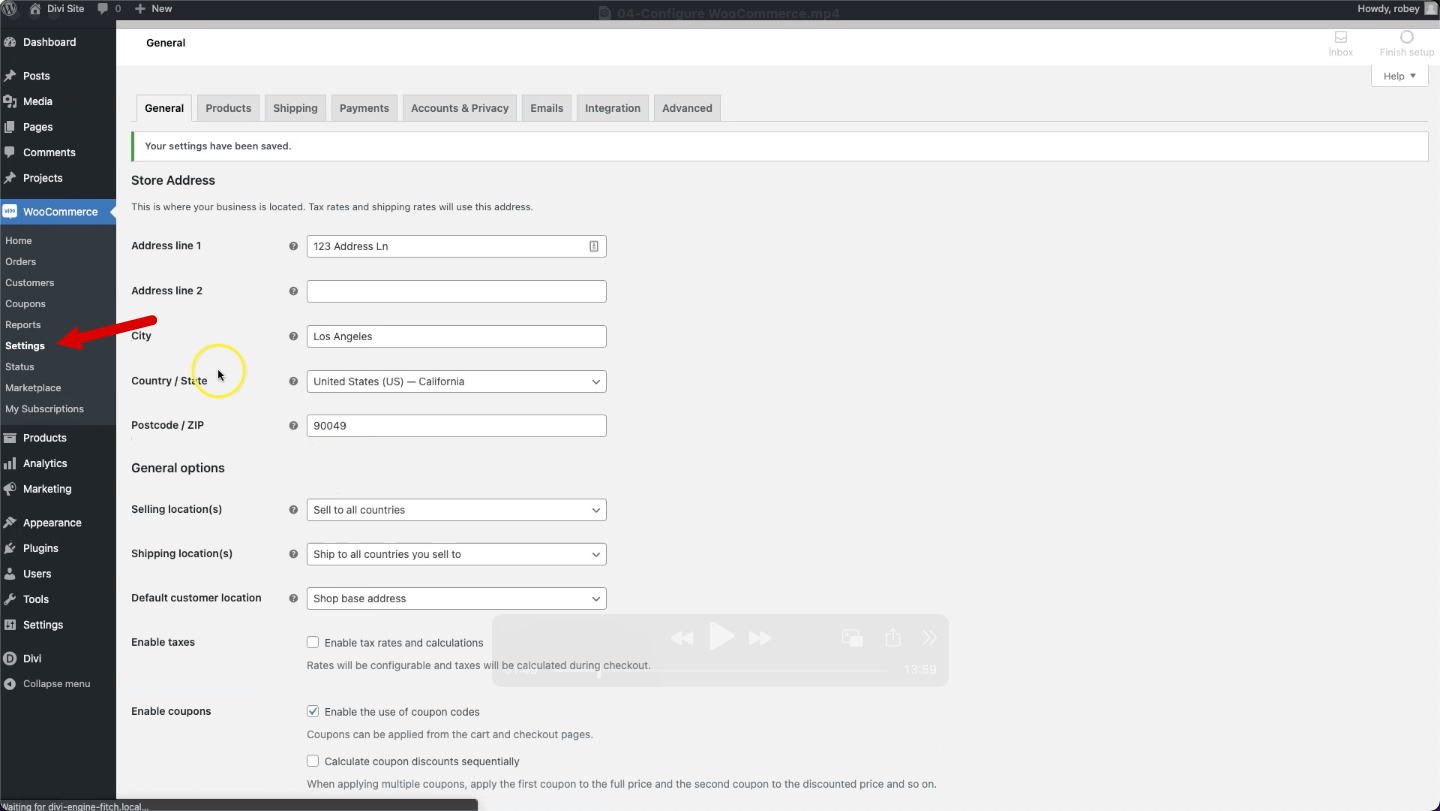
Head to WooCommerce > Settings
Complete your physical address details
Set what countries you will sell and ship to
Enable tax calculations if you so choose (more on automatic calculation a bit later)
Set your default currency for your store (we are using USD)
Shipping Zones & Options
The Shipping Tab is where we will configure all of our shipping zones. Think of the zones as the geographical area to where you might ship. Contained in each shipping zone are your various shipping methods.
For Example, you might have 3 Shipping Zones for your store, Local, Domestic, and Europe.
Within Local you have defined a free shipping option which is local pickup only.
Within Domestic you might define two flat rate shipping options for Standard and Priority delivery.
And lastly, within Europe, you might have defined another flat rate, but one that is a little more expensive than the domestic zone to cover European countries.
You can see how one might construct some super complicated shipping rates, but for this series we will keep it relatively simple and only cater to US customers.
NOTE: You can read more about the Shipping Tab in the official WooCommerce Documentation. Also, you can have WooCommerce handle all the shipping pricing for your store, you can read more about that on the WooCommerce Site.
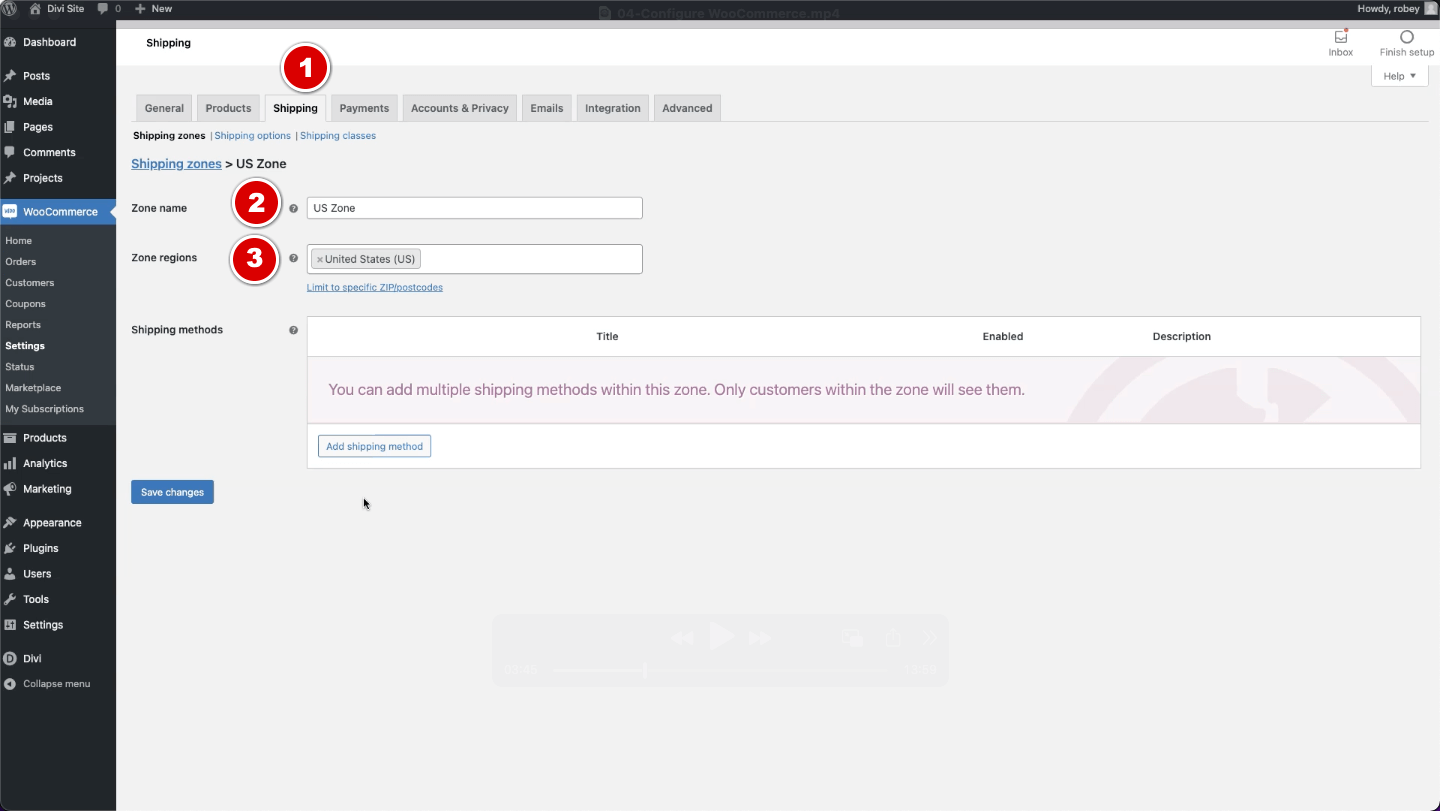
Click on the Shipping Tab > Add shipping zone
Give your zone a name (We went with US Zone)
Set your Zone regions to the United States (US)
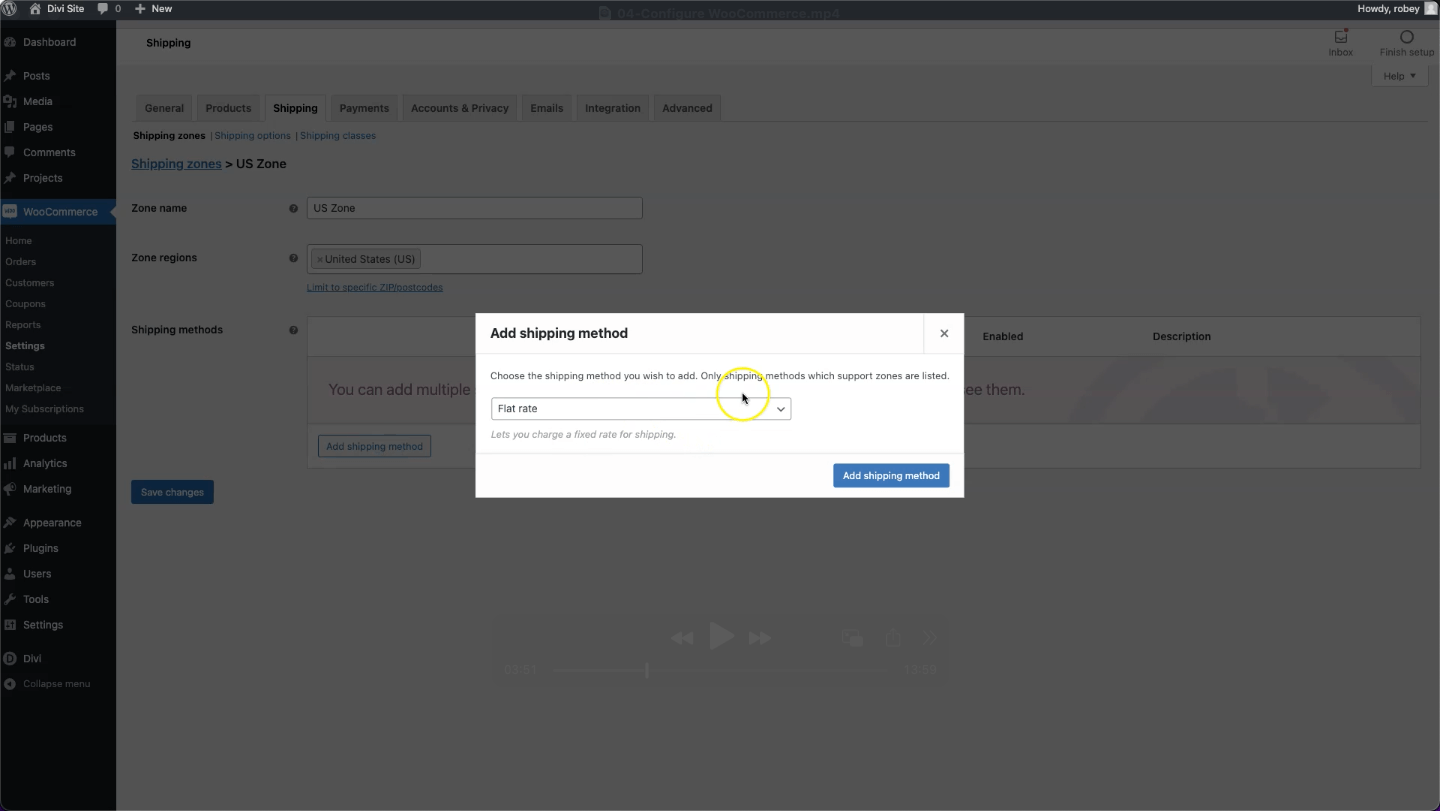
Add shipping method > Flat rate > Add shipping method
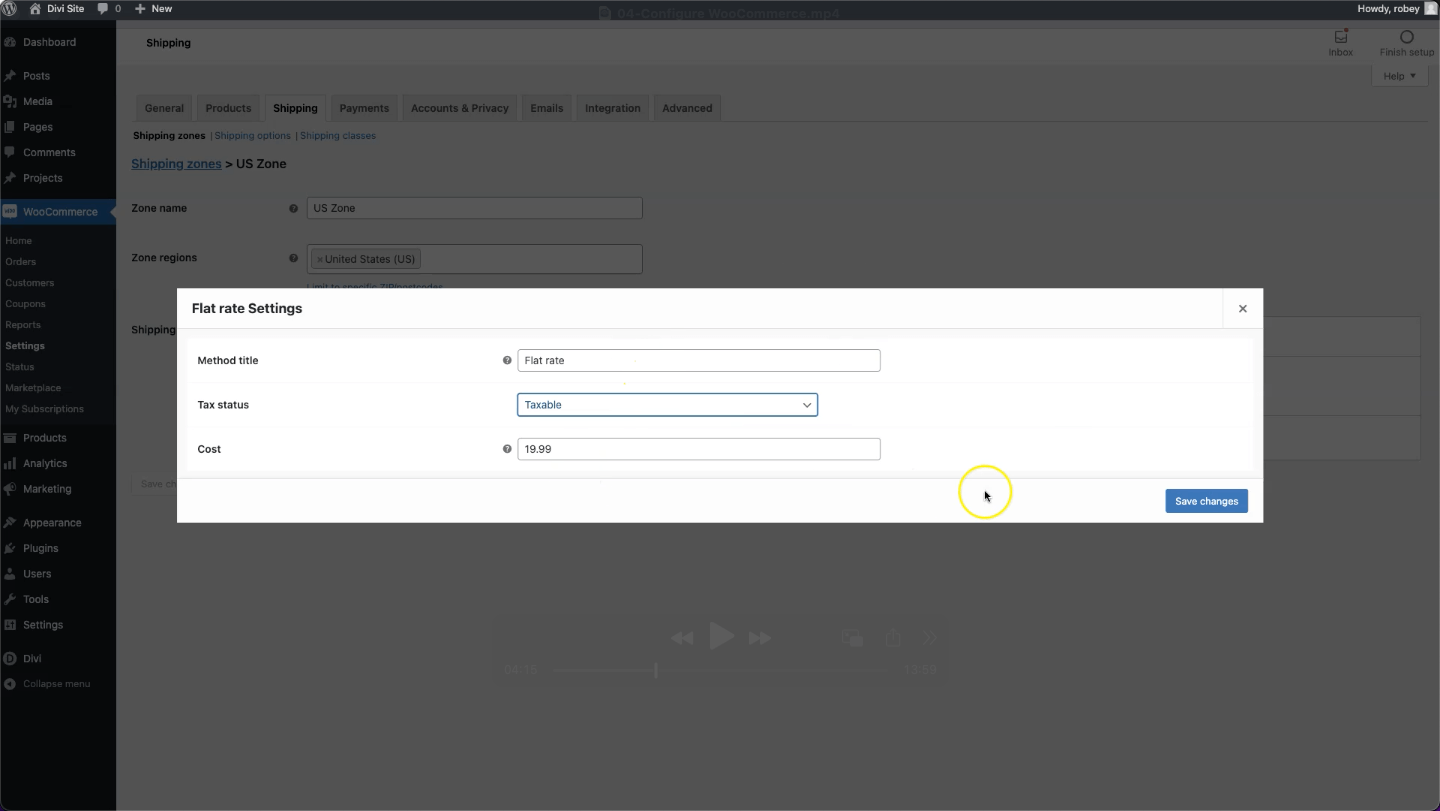
Flat rate > Edit > Cost > 19.99
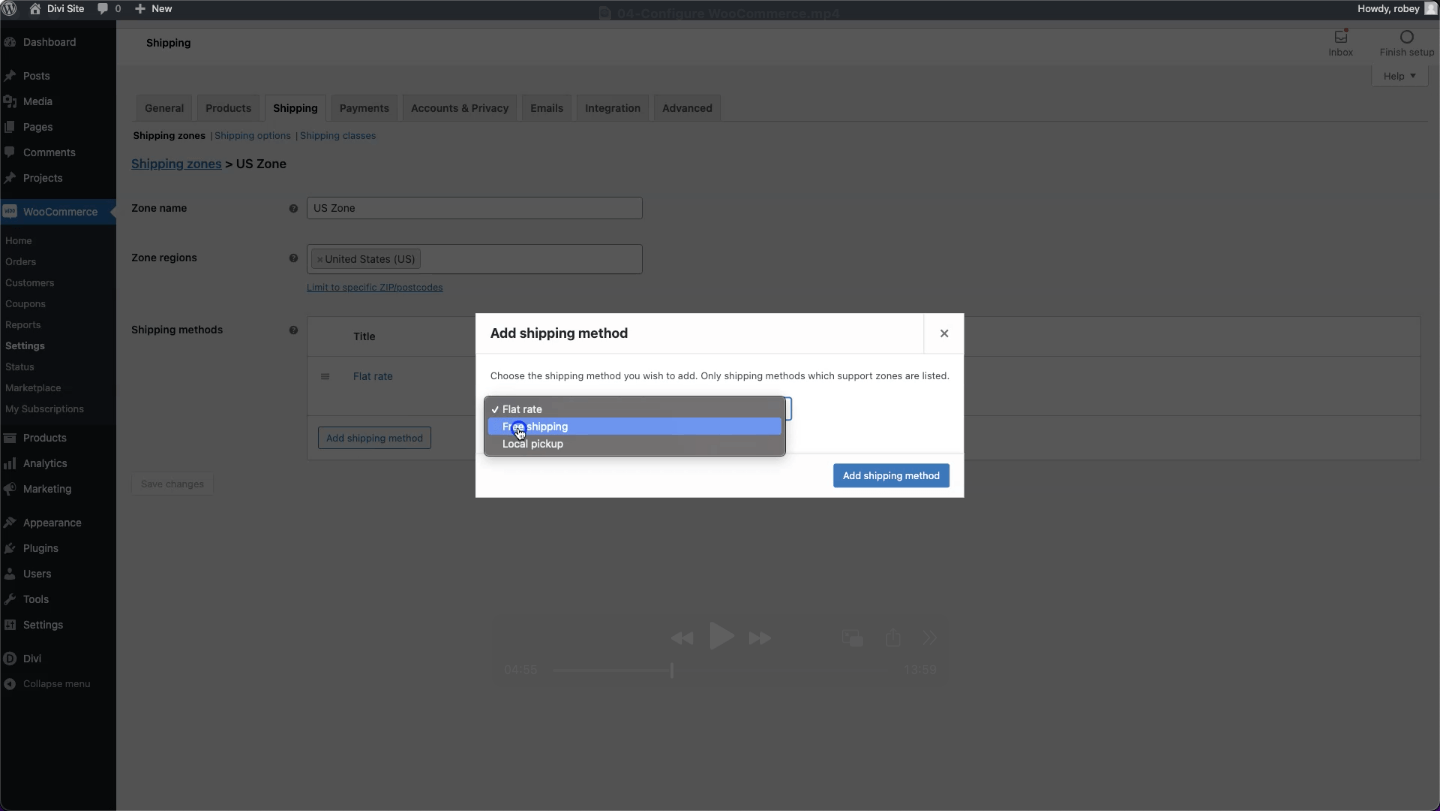
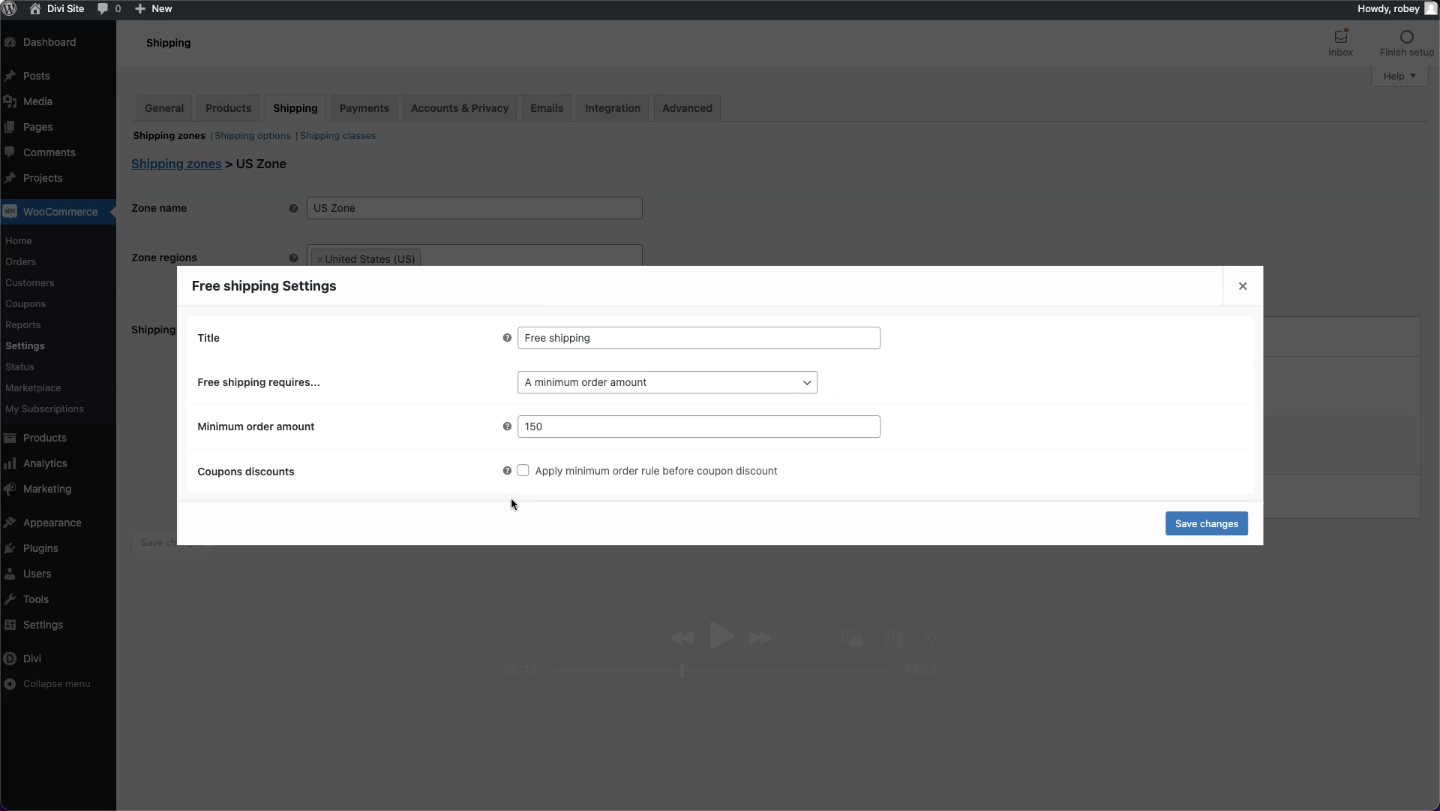
Ok, let’s also add a shipping method for FREE Shipping when a customer spends a certain amount which we’ll set to $150.
Add shipping method > Free shipping > Add shipping method
Free shipping > Edit > Free shipping requires… > A minimum order amount > 150 > Save
Payment Options
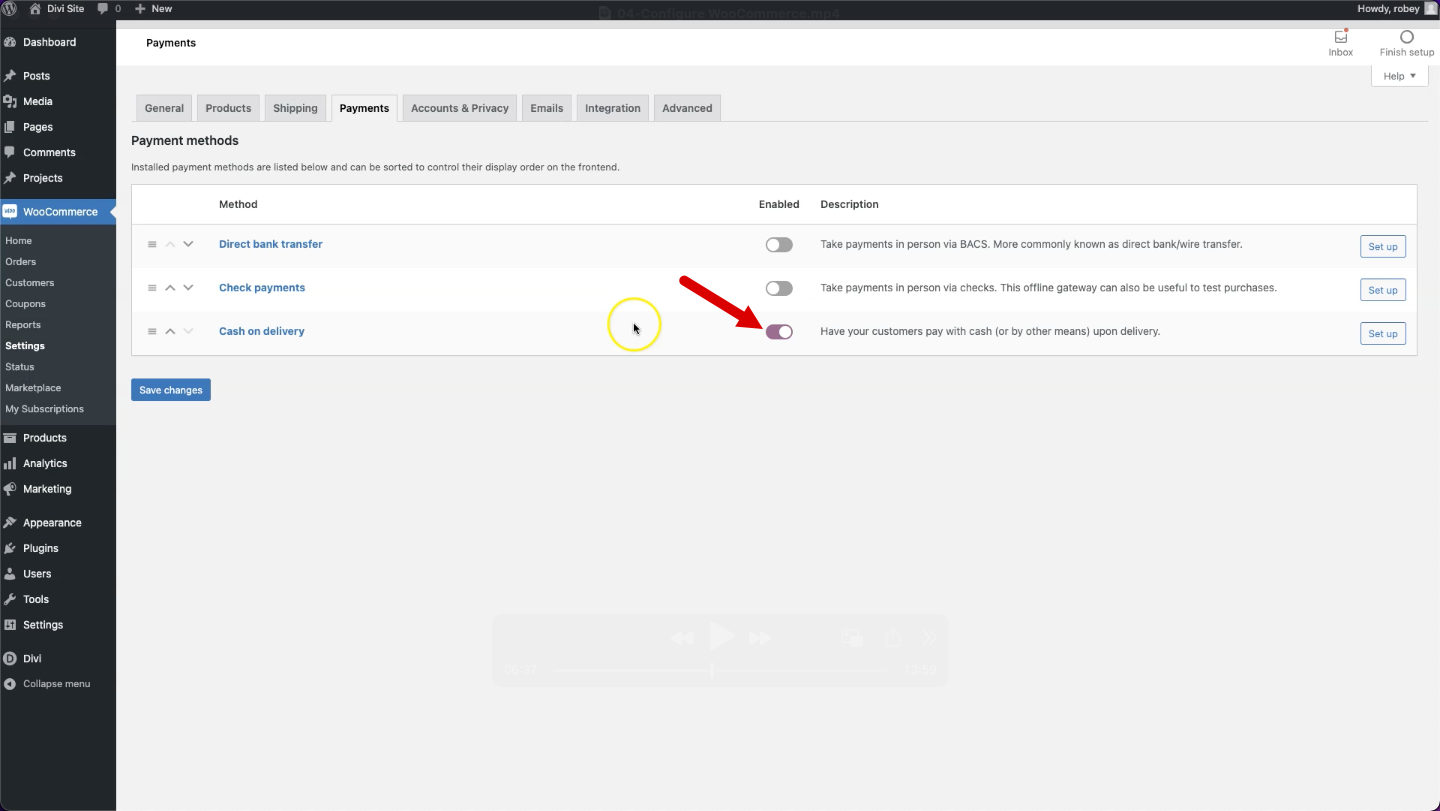
By default, WooCommerce will add 3 default payment options that you wouldn’t really use on a production site, but one of them, the Cash on delivery option is great for testing purposes. Now, I know you may be asking yourself, “But what about bank cards?”. Due to the massive amount of options in that space, we will not be discussing that in great length here, but stick around to the end of the series where will spend some time on this topic.
For now, let’s enable the Cash on delivery option so that we can later test our checkout process.
Click on the Payments Tab > Flip the switch in the Enabled column next to Cash on delivery
Yep, that is it
Account Creation
This serves more as an overview to make sure account creation is turned on and that our users can create accounts as they checkout. By default, our site will allow guest users to checkout even if they don’t have an account, so if you want or need more information on your customers, you might want to disable that feature.
This tab is also where you would set data retention and privacy options which are very important if your store is covered by GDPR laws. We will cover generating and assigning a privacy policy page later in the series.
For this step, we just want to make sure our users are able to create an account during checkout and we’ll also allow them to create one if they land on the My Account page somehow.
Click on the Accounts & Privacy Tab
Check Allow customers to create an account during checkout
Check Allow customers to create an account on the “My account” page
My Account Section (Removing Downloads)
WooCommerce is the most popular eCommerce platform in WordPress because it can be used for almost any type of store right out of the box, this includes both physical and digital items, but rarely will a store sell both. For that reason, since we are selling apparel in this tutorial, we don’t need Downloads to show on the My Account page as we’ve not yet dropped our hit show tunes album YET.
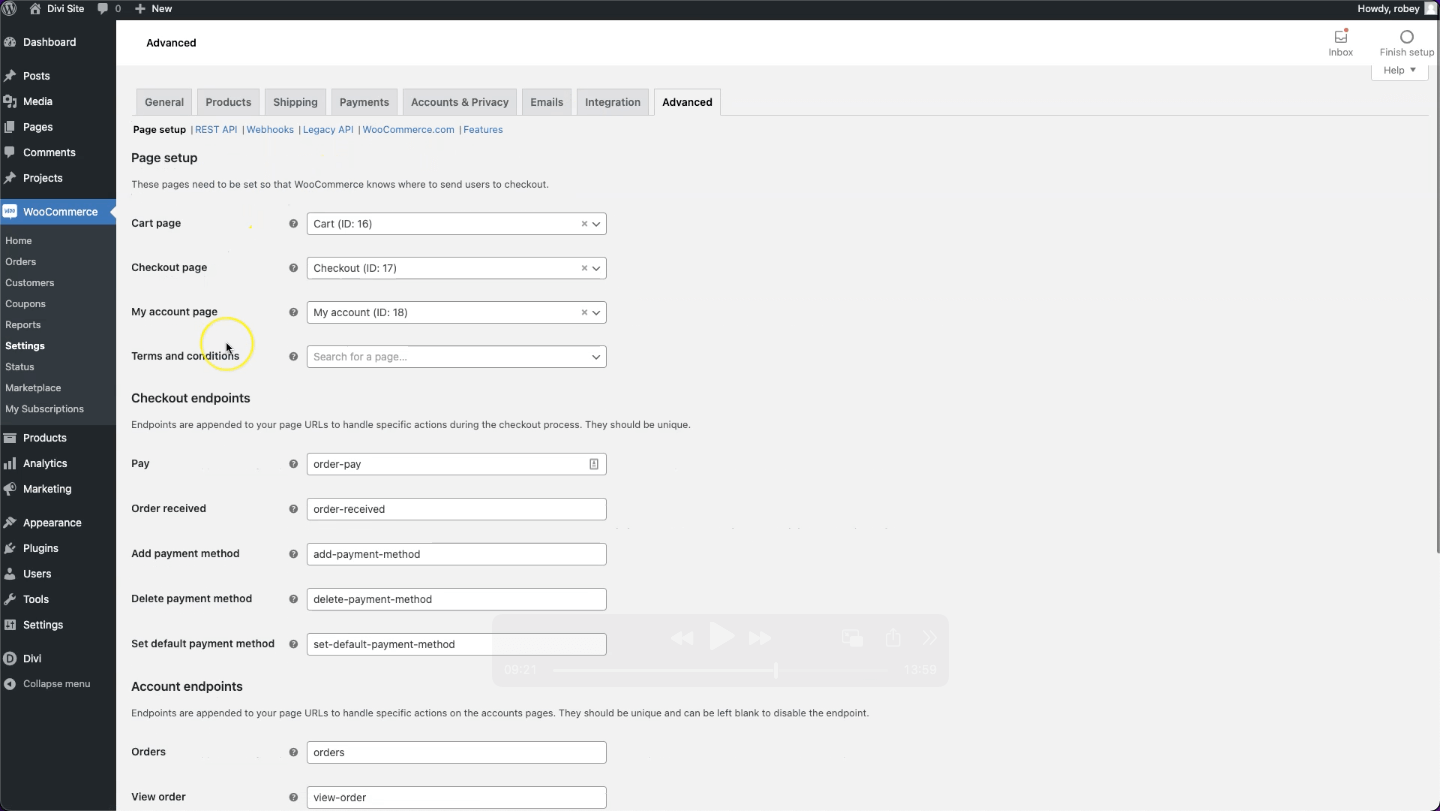
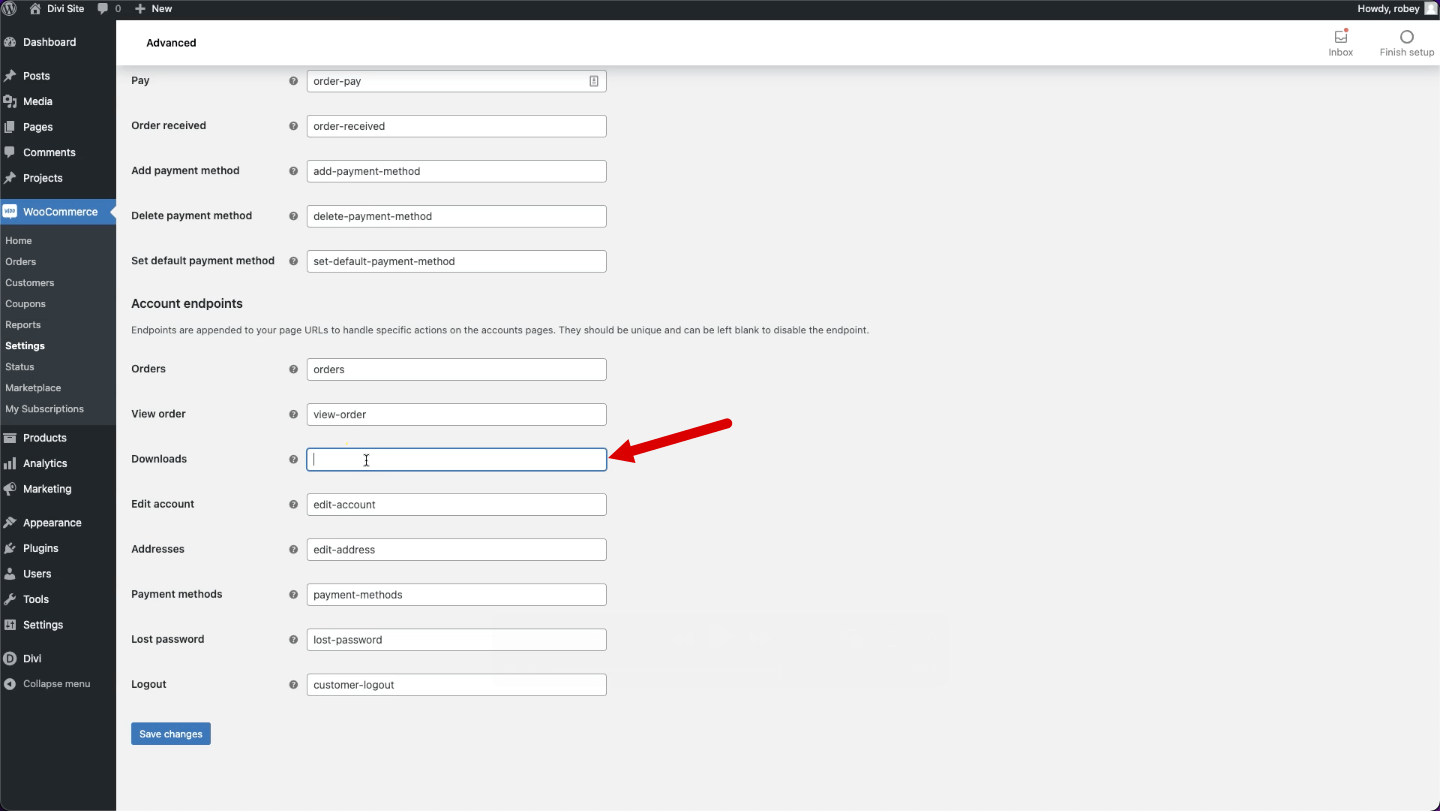
The WooCommerce My Account page lists a download section by default in case your customers need to download their digital purchase again which is very convenient, but not applicable here. The WordPress term for this section is an endpoint, so all we need to do is delete the endpoint, so let’s do that.
Click on the Advanced Tab > Account endpoints > Delete the word downloads
Product Categories
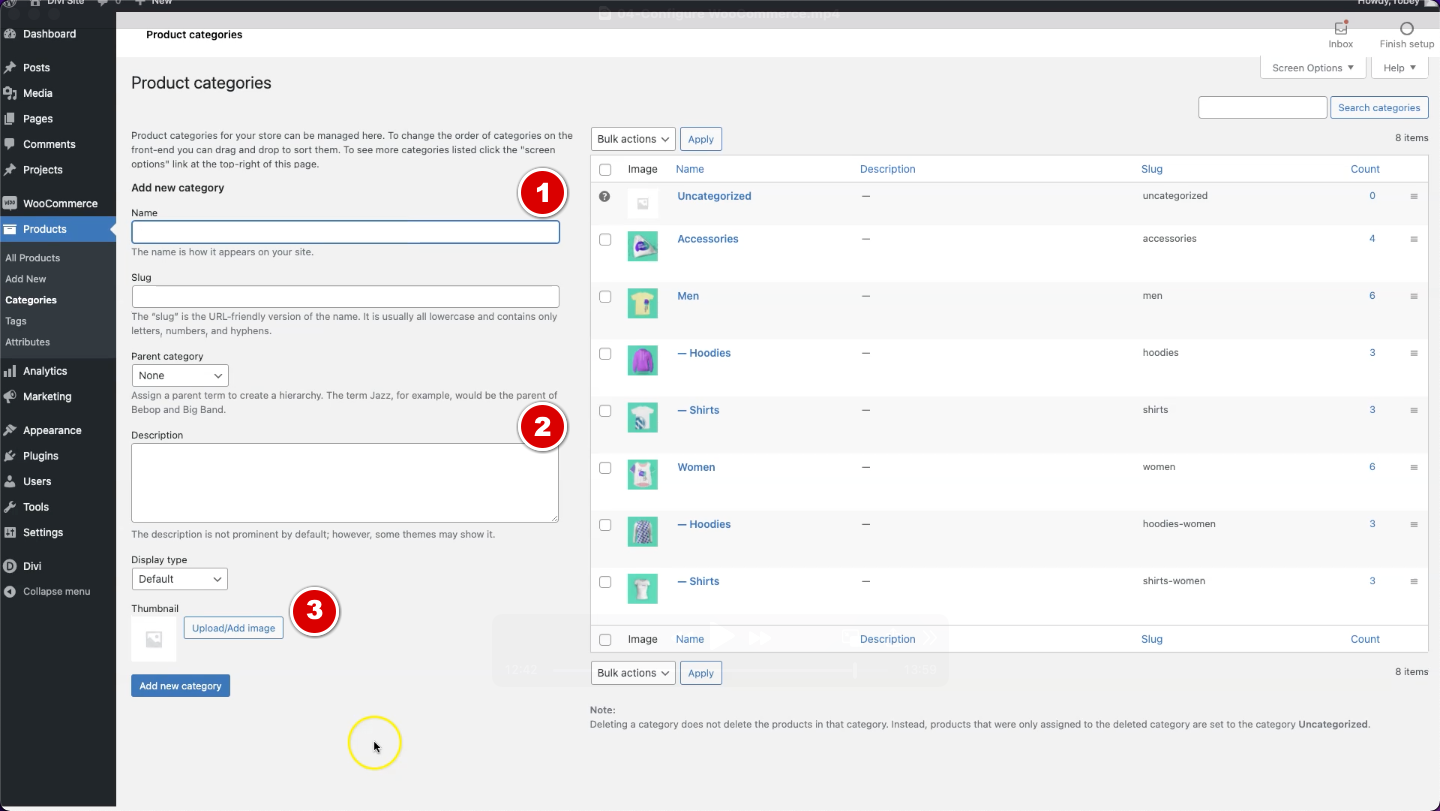
To help your users navigate your site and understand your products better, it is a good idea to create some product categories. On the site we are building we have created categories for Men’s and Women’s apparel, as well as some Accessories. Nested in these categories are some sub-categories for Shirts and Hoodies. This taxonomy not only helps your visitors but will also help search engines better understand what type of content lives on your site. In addition to the required category name, I recommend adding a brief description of the products in this category which could also be a history of the products if this is something like a Limited Collection. It is also a good idea to add a category photo as it can be used in tandem with the other fields on archive pages.
If you used our Free WooCommerce Sample Products CSV file above, then you already have some product categories configured, but let’s quickly walk through adding a category just in case you’re like me and want to know how it all works.
Head to Products > Categories
Name your Category
Give it a Description
Add a Photo
Product Attributes
These are not to be confused with product categories as these serve to describe the products that you sell on your site. Think of things like sizes, colors, materials, or even brands. What is also super convenient is that these attributes can be used to generate variations of products so that you would not have to add a product for let’s say each size or color of a shirt. Nice one team WooCommerce!
For our online store, the Free WooCommerce Sample Products CSV file above will add all the attributes we mention above but don’t fret if you’re not using it, I’ll quickly tell you how you can add your very own attributes as your needs require.
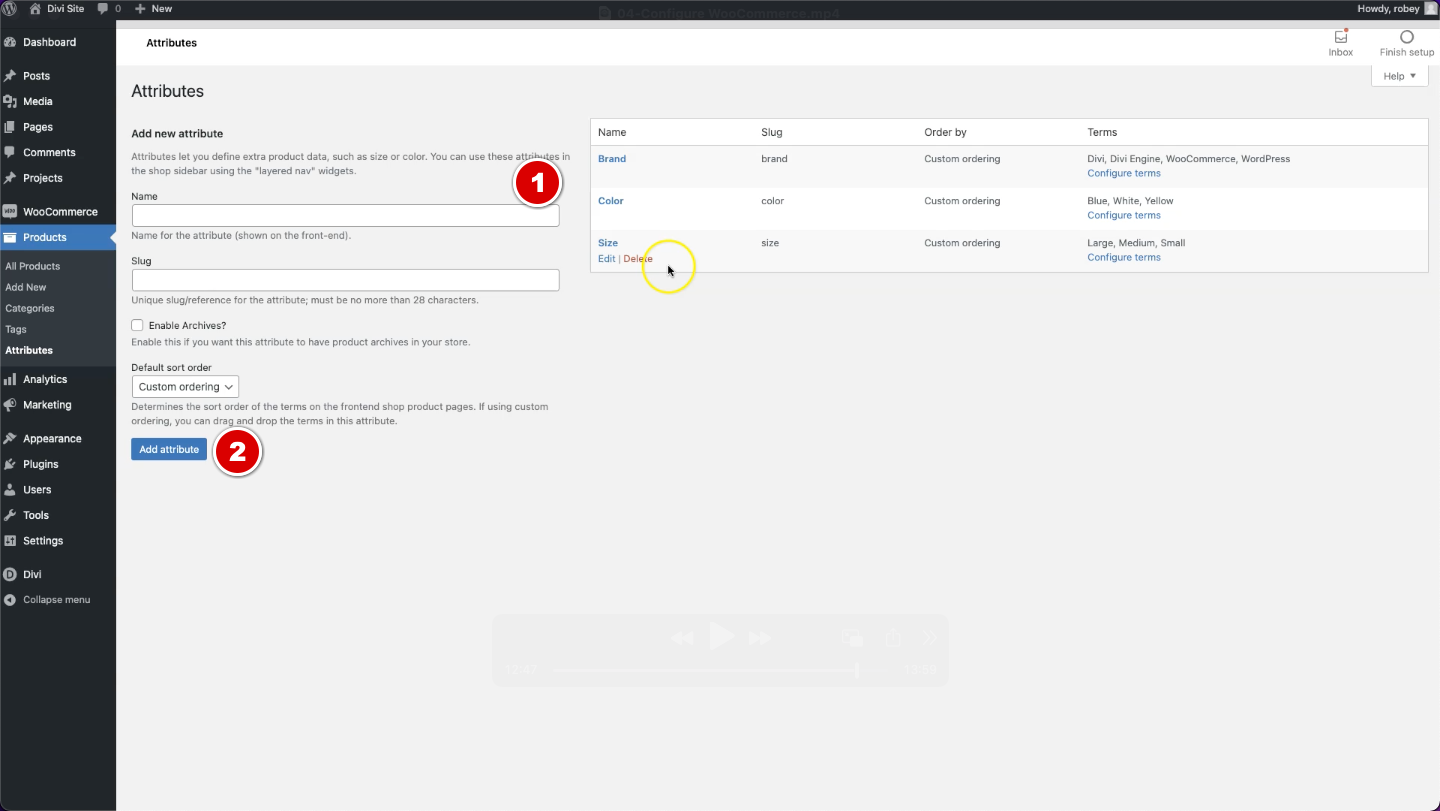
Head to Products > Attributes
Name your Attribute
Click Add attribute
With our attribute added, we are now good to configure the various attribute terms. Confused? I gotcha. Let’s take the attribute Size for example. The terms you will need to configure are the different sizes like small, medium, and large. For Colors, it might be blue, white, and yellow.
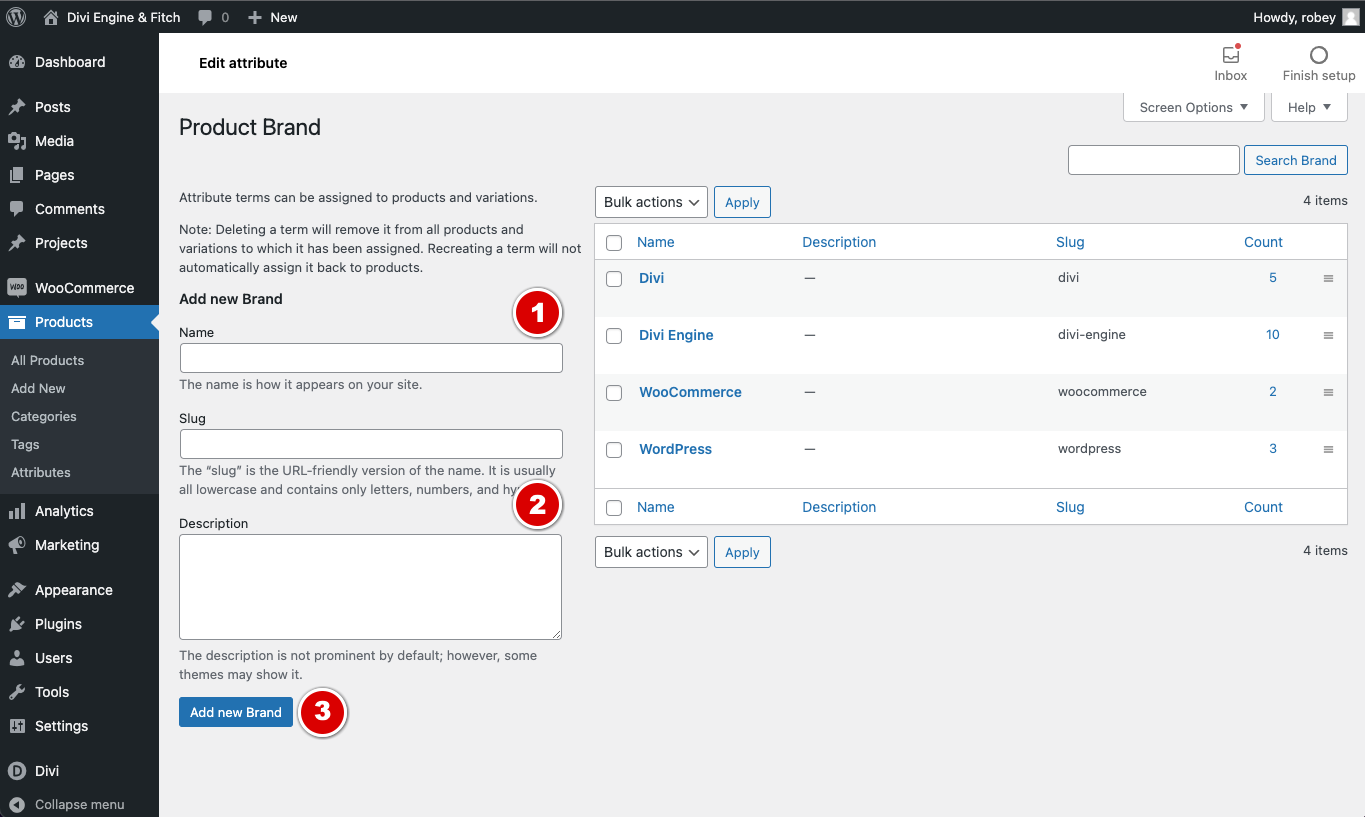
Our CSV file comes with these already configured, but take a look below to see how you would configure your very own terms.
Click on Configure Terms under your new Attribute
Name your Attribute Term
Give it a Description
Click on Add new
Repeat this for each size or color or whatever attribute you need options for
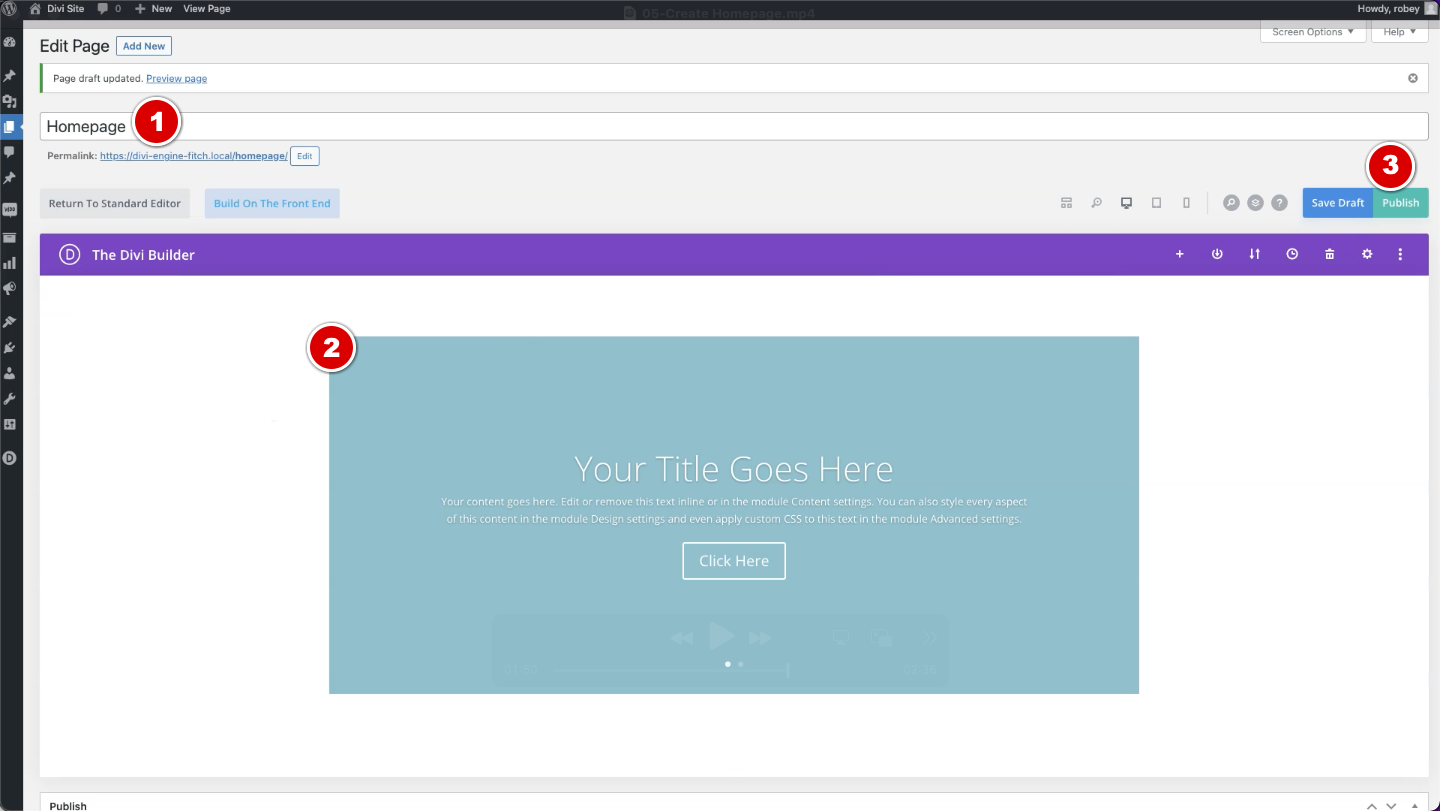
Create a Homepage
To configure our WordPress settings, we first need to create an empty homepage which will be set as the default page which is displayed when users visit the root of your domain ie. www.yourdomain.com. It takes just a couple of minutes, so let’s do it!
Head to Pages > Add New
Give your page a name and enable the Divi Builder
Add a Slider Module (It doesn’t matter what you add, it is just placeholder content that will be replaced later)
Publish your page
Configure WordPress
It is all coming together! Right now we need to remove some of the default settings in the WordPress setting to make sure our users see the right branding and get directed to the right page when they visit our domain. There are certainly many settings we can change in WordPress, but for now we will laser our focus on these.
To do this we will set out site name, enable folks to register, set the landing page, and update our permalink structure if needed. Let’s jump to it!
General
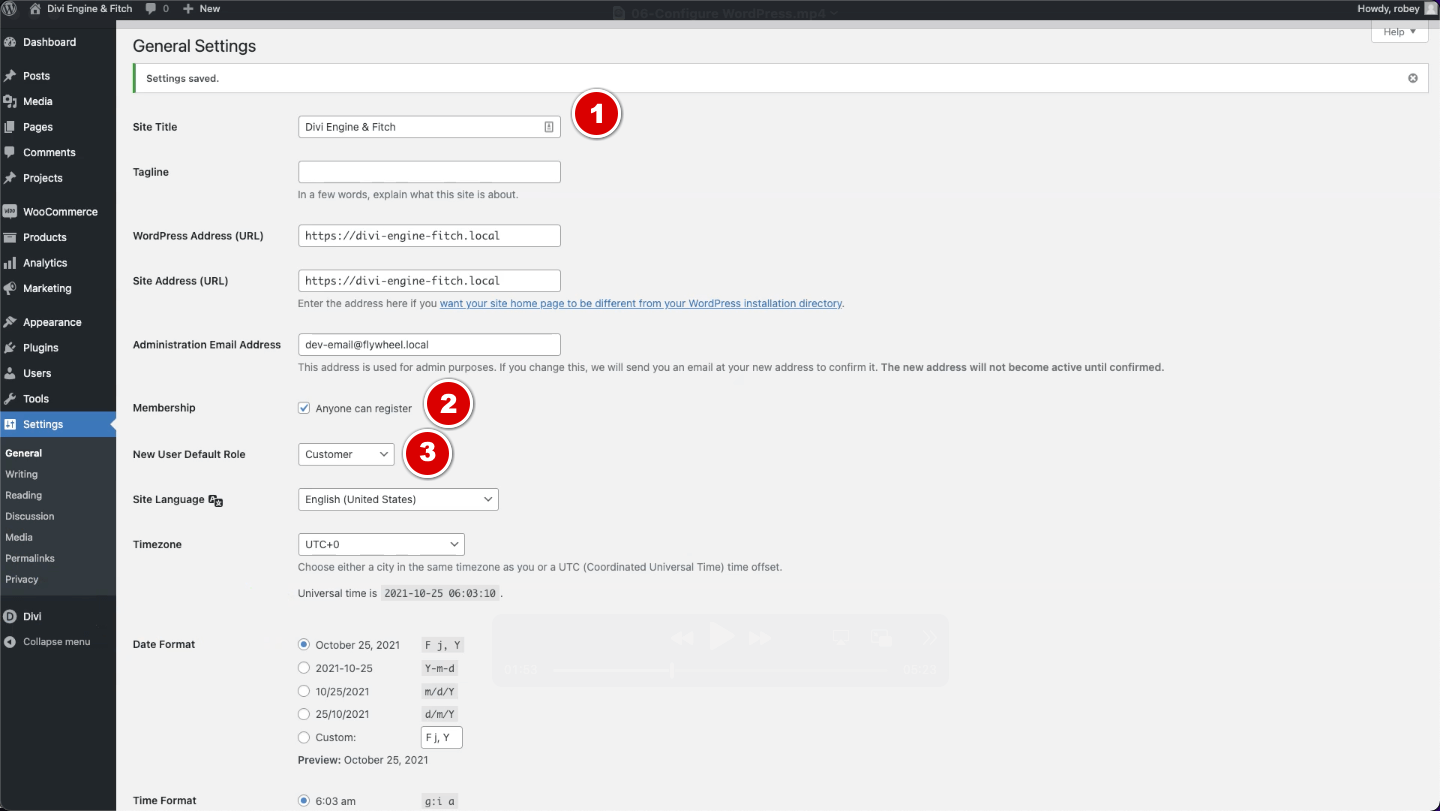
First, we will set the site name that appears in the browser tab and enable folks to register to the site.
Site Title
Head to Settings > General
Site Title > Change to Divi Engine & Fitch
Registration
Membership > Check Anyone can register
New User Default Role > Customer
Save
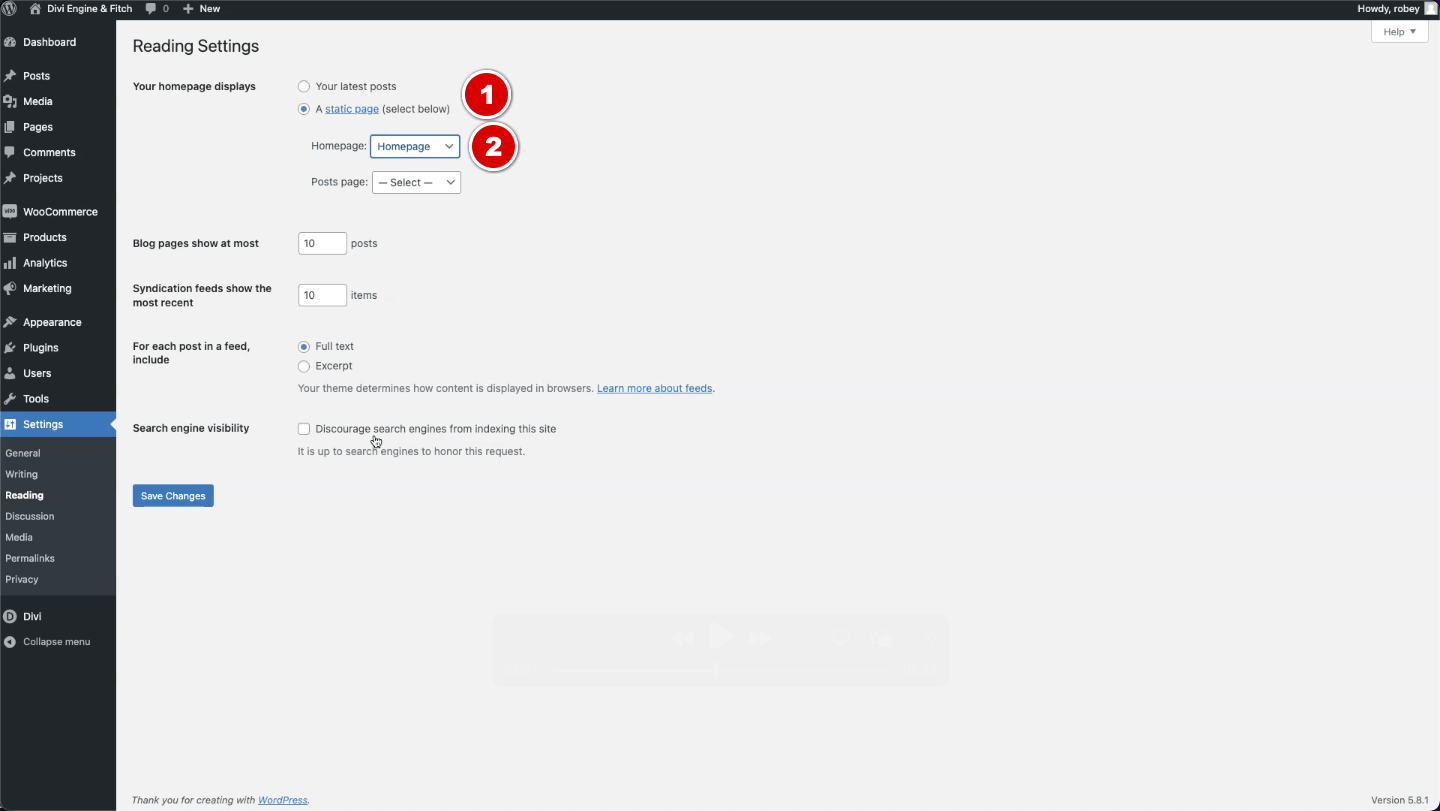
Reading
Time to change that ugly landing page to, well, another ugly landing page, but not for long!
Head to Settings > Reading
Your homepage display > A static page
Select the page that we created in an earlier step, it should be called Homepage
Save
Permalinks
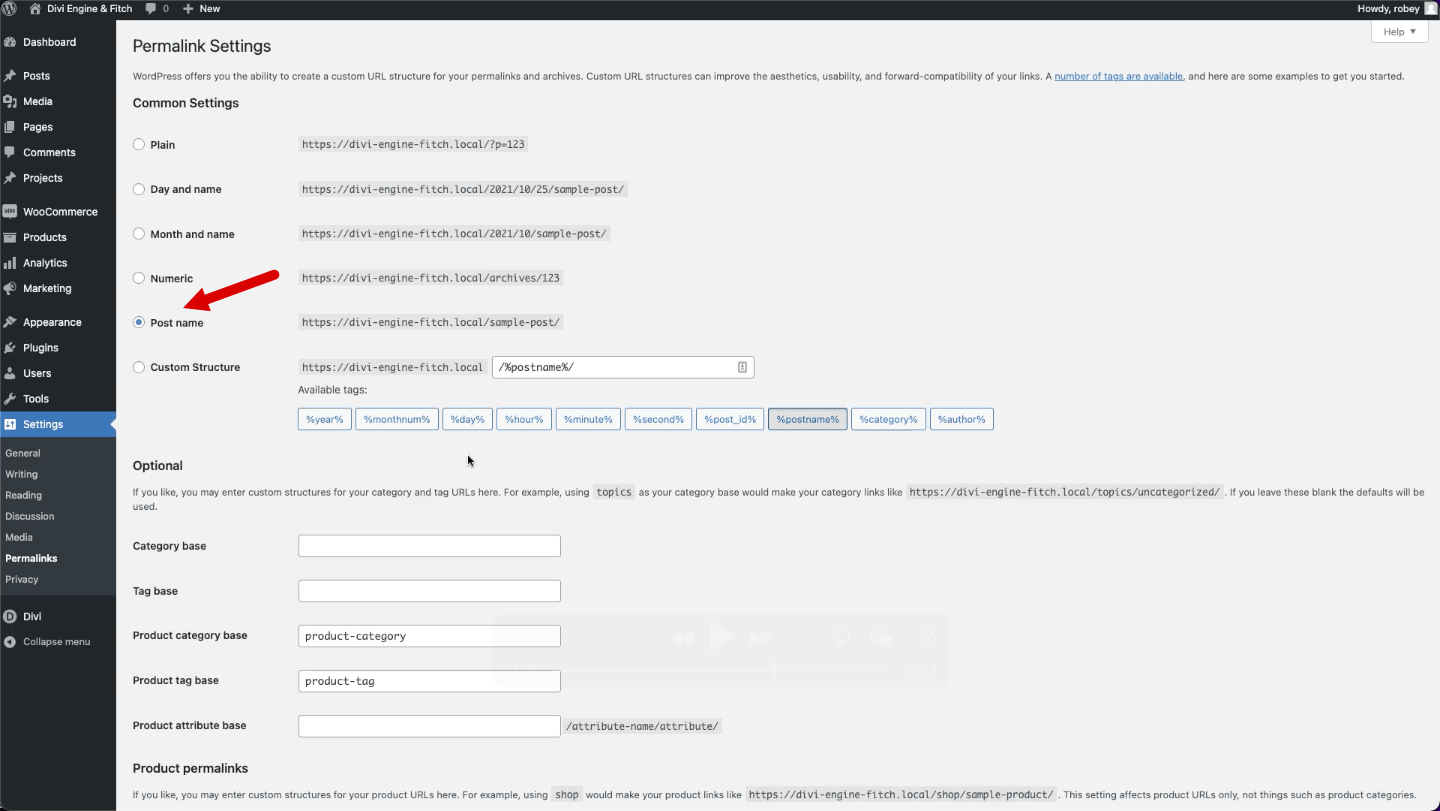
This page control the URL structure of your site or more specifically, the permanent URL structure of your site. By default, WordPress URLs uses the query string or Plain format which looks something like this:
https://www.yourdomain.com/?p=233
Yes, it looks terrible, so we need to make sure we change that some something a little more human. Now there are a bunch of formats on this page, but we are interested in the Post name format.
This is better for SEO because now your URL will describe the content on the page. Speaking of SEO, you should almost never change the URL structure of an established site as this could destroy your search engine rankings. Sure you can do 301 redirects, but you should still avoid this if possible.
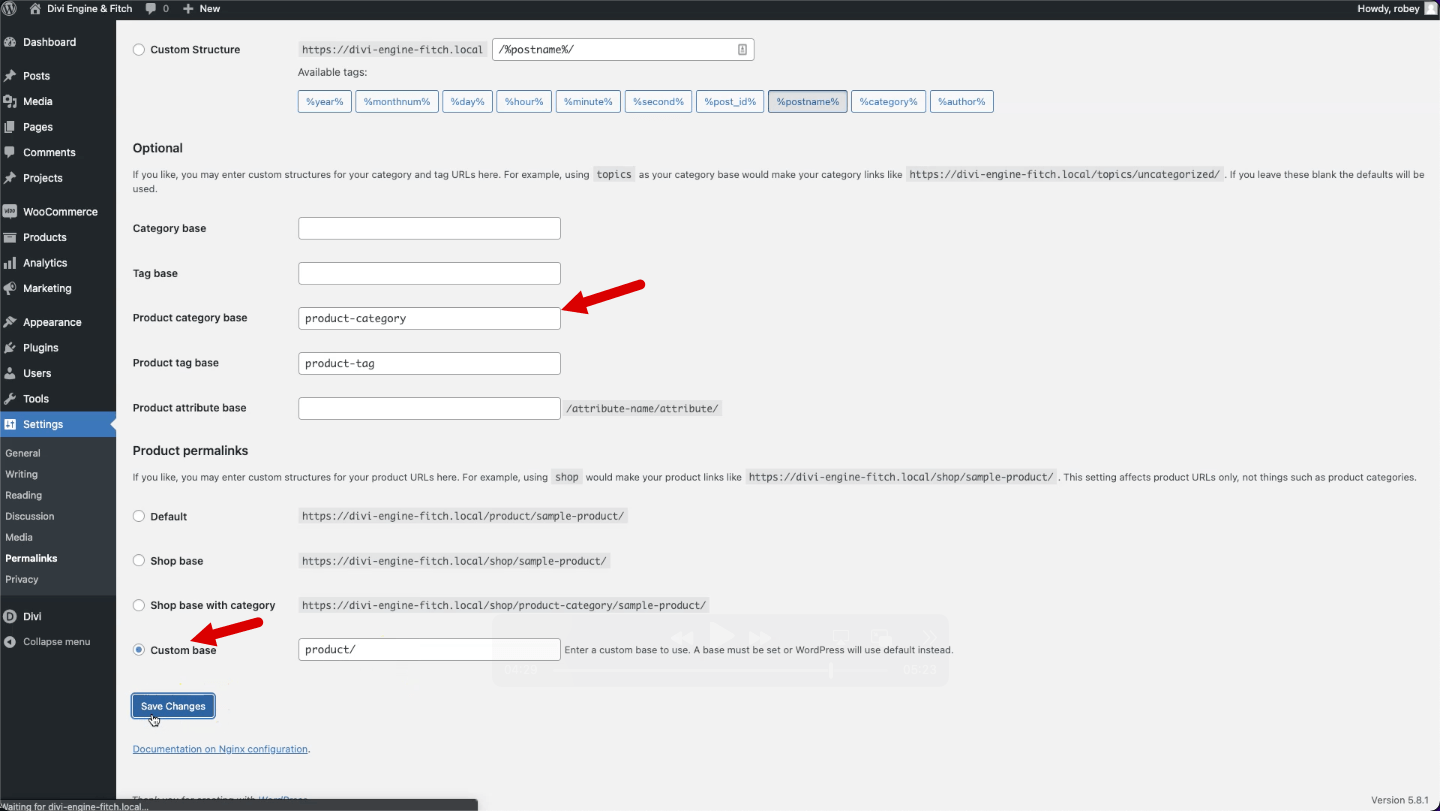
Head to Settings > Permalinks
Common settings > Select Post name
Yep, it is that easy
WordPress is pretty smart as it allows you to also control the permalink structure for your store products. We can set the URLs for things like the actual products and category pages.
We will be leaving this at the default settings, but let’s take a look at those settings just so you know where to change them if need be.
Configure Divi
Divi has a ton of different settings that can help you build your dream sites, and honestly, we could do a course on just the settings alone. To save you time, and for us to keep the eye on the ball, we will focus on just a few settings that will help our site run buttery smooth as well as help us out to build more efficiently.
We will also drop the fancy Divi Engine & Fitch logo into the settings which you can easily download by just right-clicking and saving the image below.

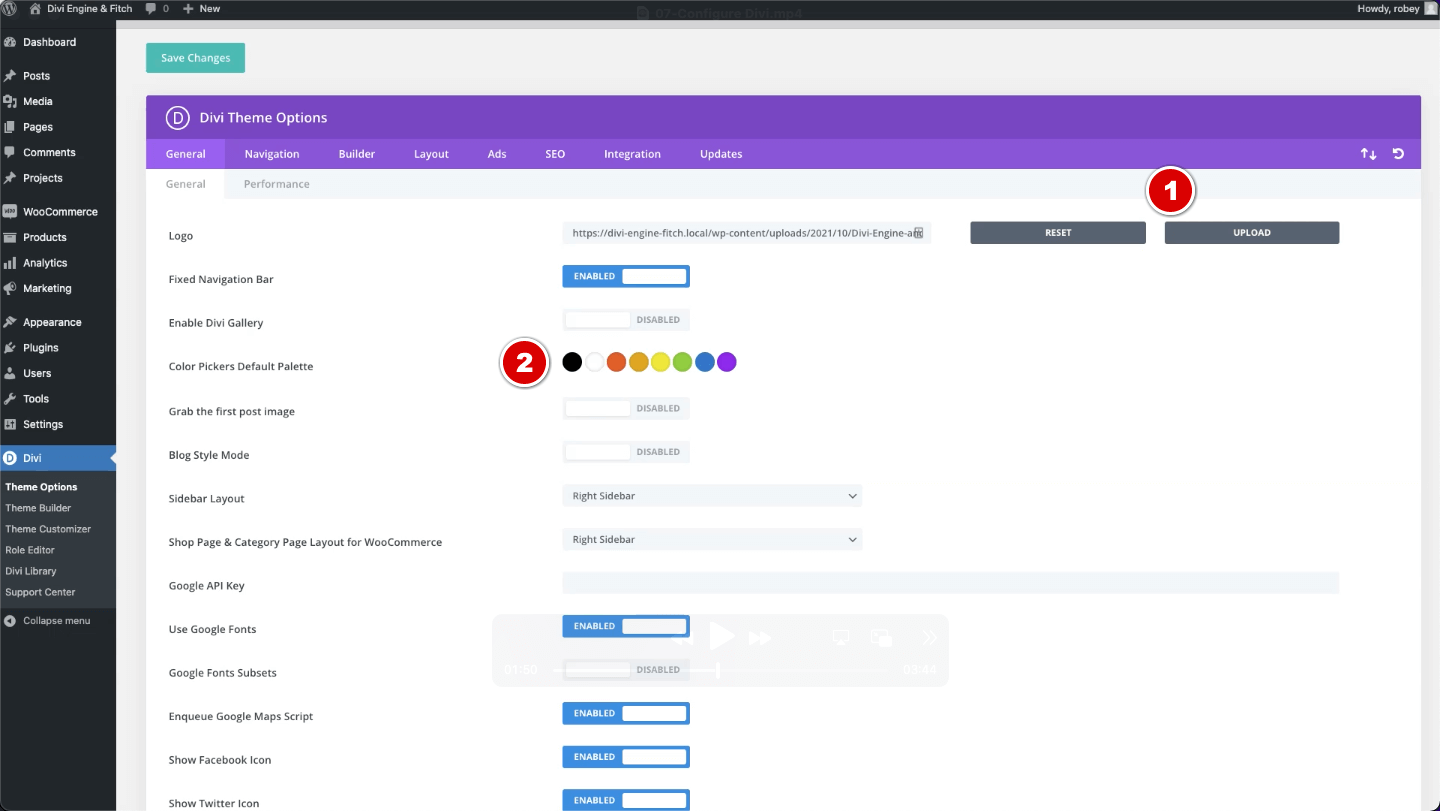
Head to Divi > Theme Options > General Tab
Site Logo
Logo > Upload
Color Palette
Color Pickers Default Palette > Click into 4 of the colors and change them to the following color codes:
- Off-white – #f6f6f6
- Dark Blue – #253746
- Orange – #e04405
- Tan – #e8dccf
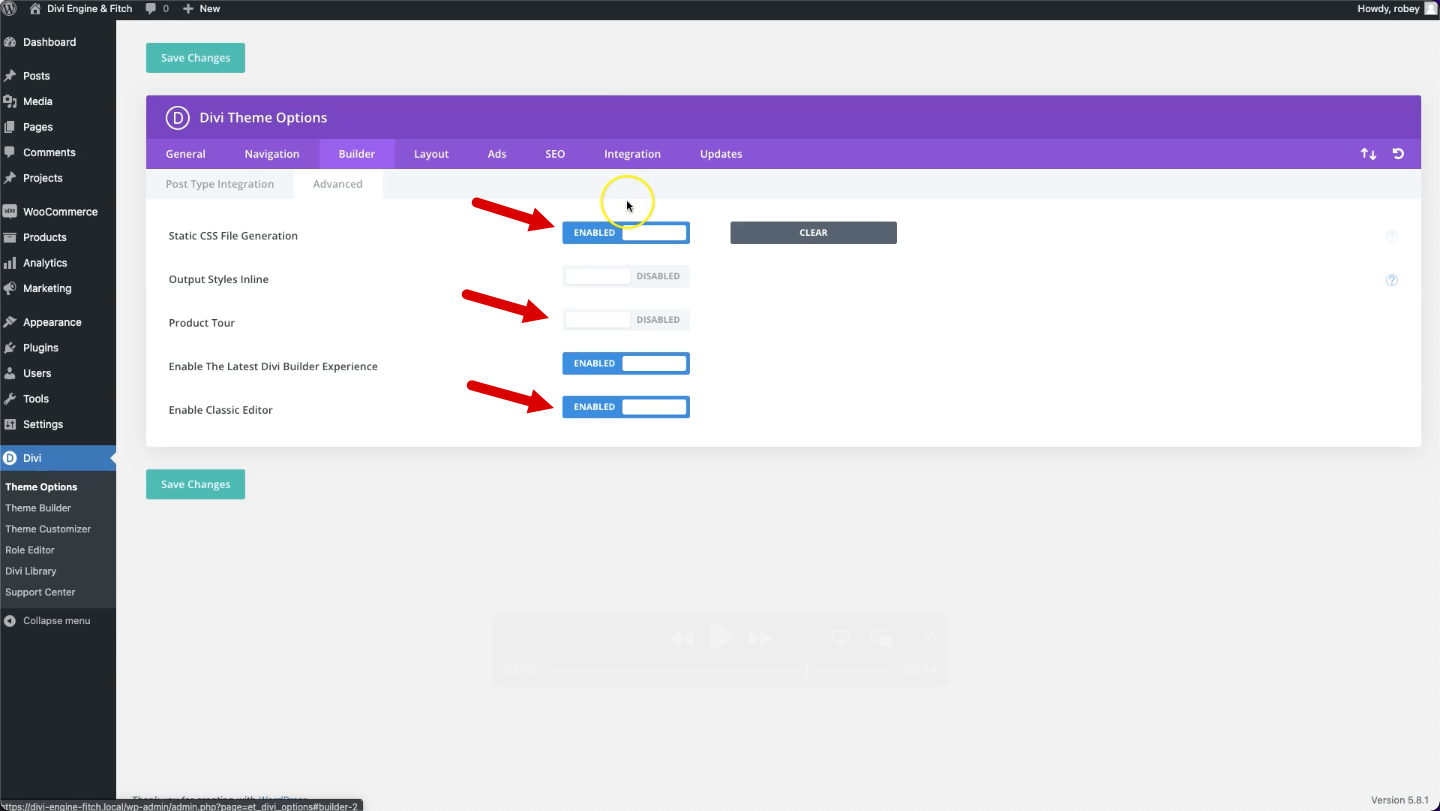
Lucky you, we already inspected the Abercrombie & Fitch page to find all the color codes for you. Next we just have to set ourselves up for [Borat voice] great success by changing how our site handles CSS by turning off Static CSS file generation. Don’t get me wrong, there is a place for this setting, but while building a site it can cause issues with reflecting the most recent changes, and sometimes even completely break your site layouts.
Head to Divi > Theme Options > Builder Tab > Advanced
Static CSS File Generation > Off
Save
Here you can also change some of the Divi Builder settings like disabling the annoying Product Tour and enabling the Classic Editor which is my preference.
Set Global Styles & Branding
This step is often overlooked by developers, but trust me, it will save you a ton of time! Setting global styles for things like fonts and buttons go a long way as you build your client sites out. And it is just tedious to keep changing styles on each individual element.
Work smarter not harder, even when coming up with cliches.
We will also deepen the branding on our site by adding a favicon and applying the color palette we set earlier.
What are you waiting for? Let’s go!
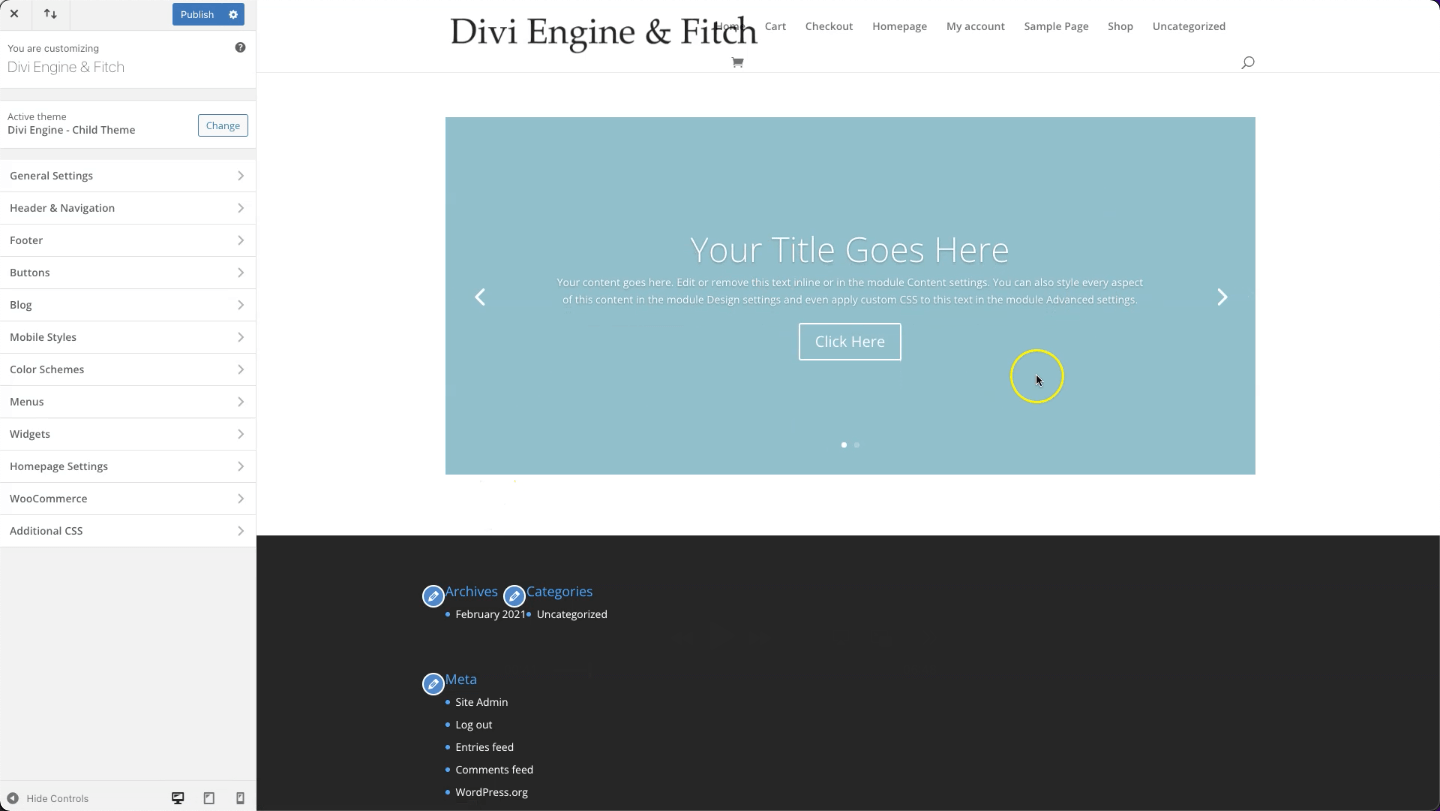
Head to Divi > Theme Customizer
Favicon
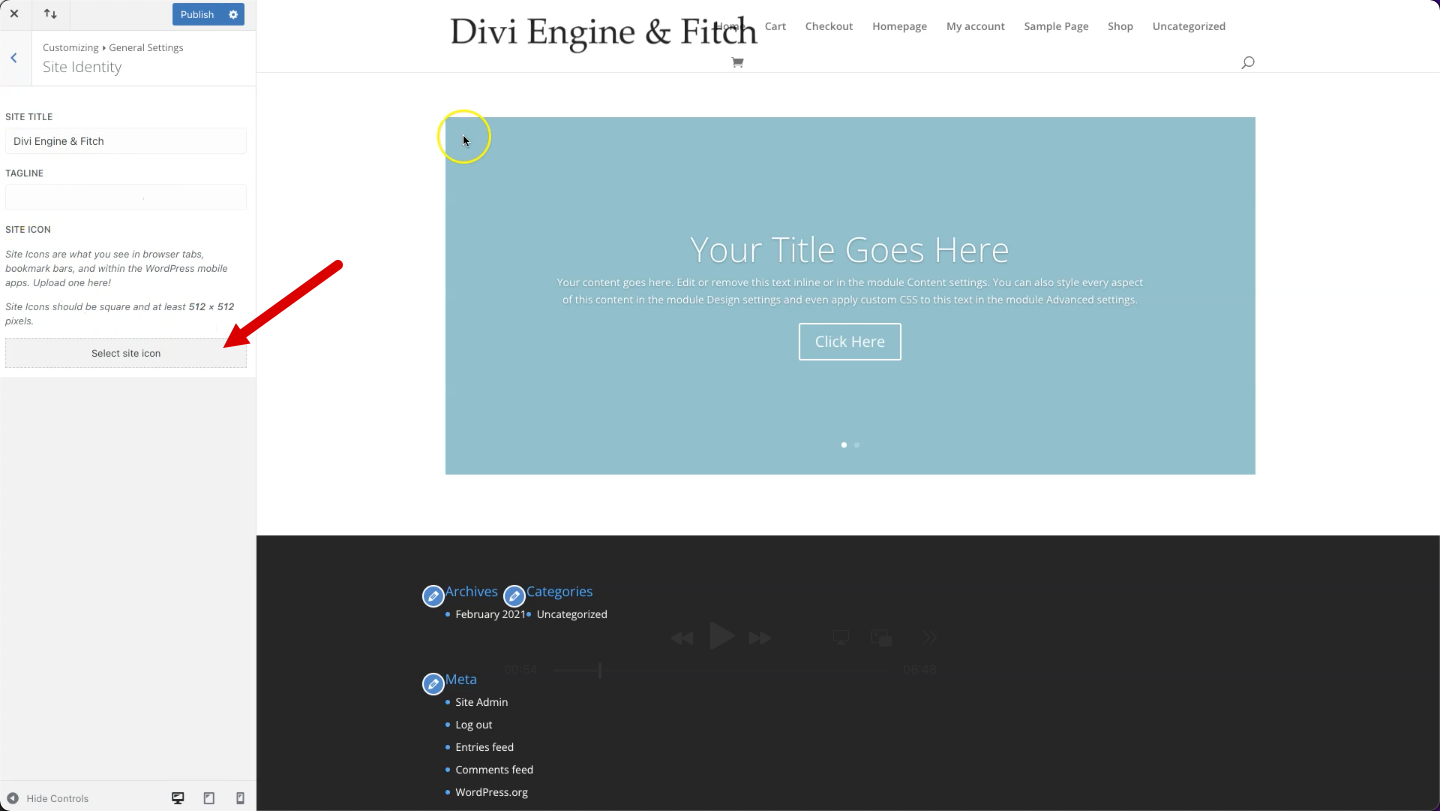
First, we will set the site favicon. For this, it would be good to have an image that has equal width and height, 512px by 512px should be good. If you don’t have one, don’t stress, WordPress will allow you to crop any logo or image for a favicon.
And of course Divi Engine has your back, so you can use the image below also.
Head to General Settings > Site Identity
SITE ICON > Select site icon > Upload your favicon
Typography
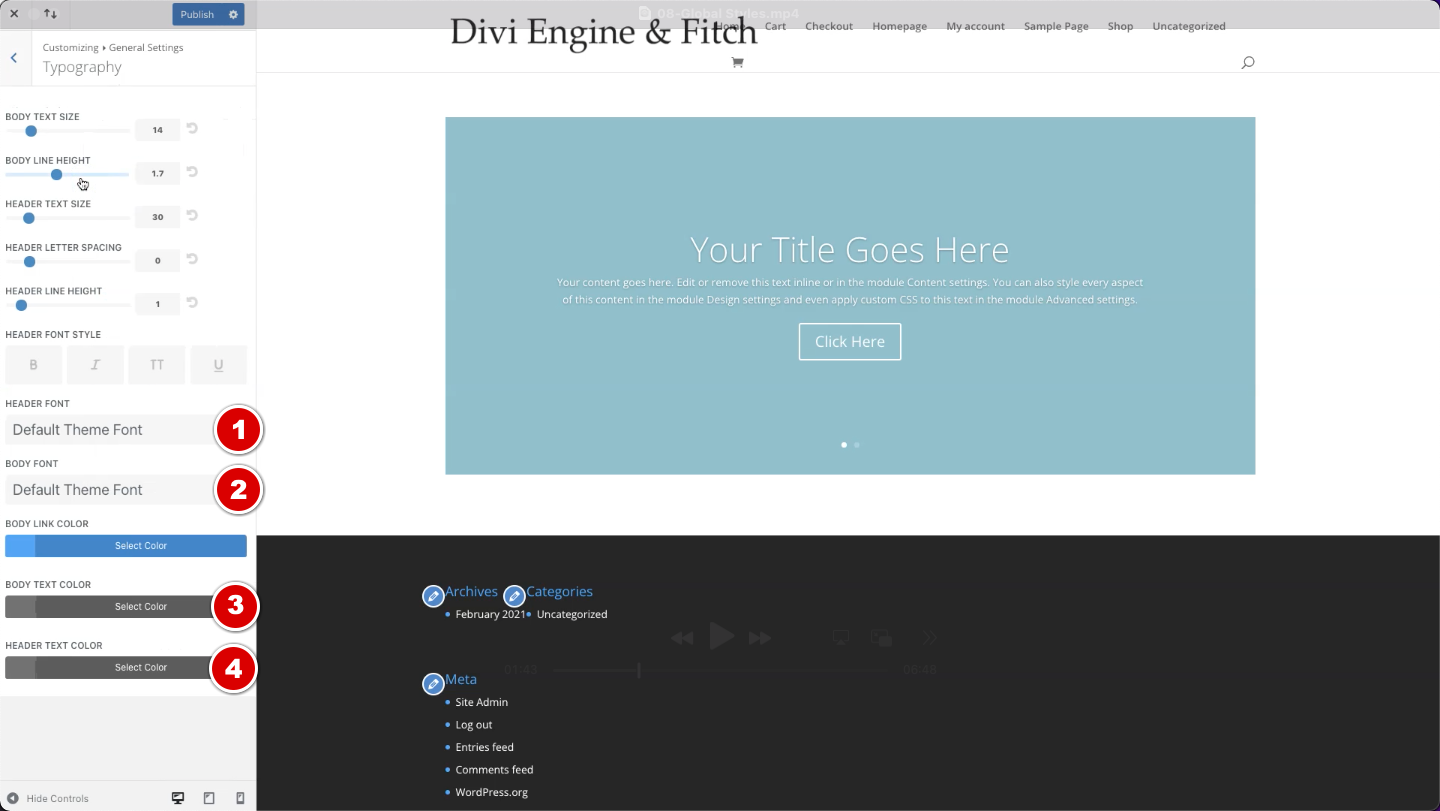
Changing the default fonts for header and body text along with the colors for your entire site takes a few swift clicks. You can change many other styles as they pertain to text on your site right here, but we are happy with the rest of the settings.
Head to General Settings > Typography
HEADER FONT > Poppins
BODY FONT > Roboto
BODY TEXT COLOR > Dark Blue (remember we set this to our palette earlier)
HEADER TEXT COLOR > Dark Blue
Buttons
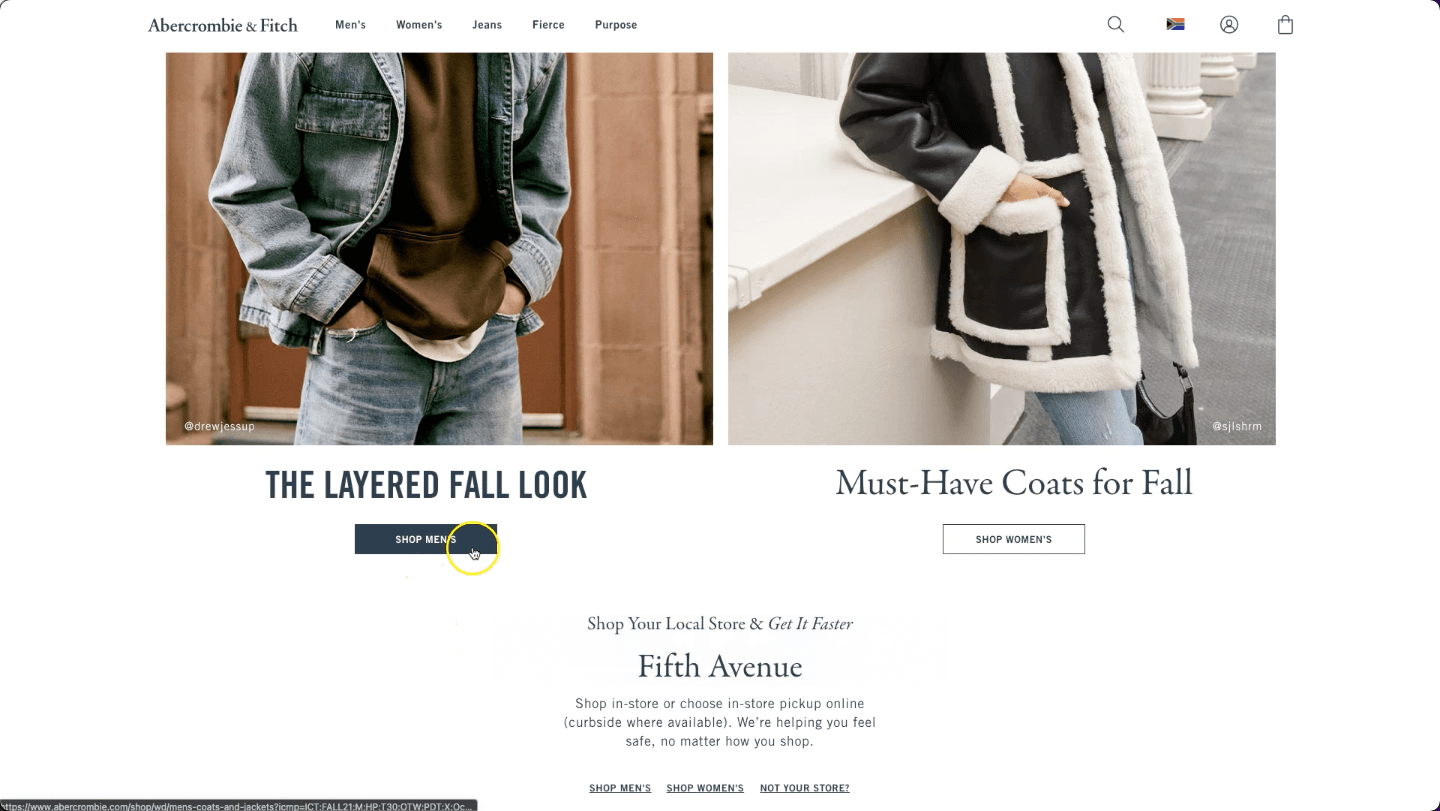
Let’s be honest with each other here, the default Divi buttons are pretty darn ugly, and a dead giveaway of a Divi site. We are going to fix that right now and we will draw inspiration from the Abercrombie & Fitch site and the button style they used.
Let’s take a look.
Button Style
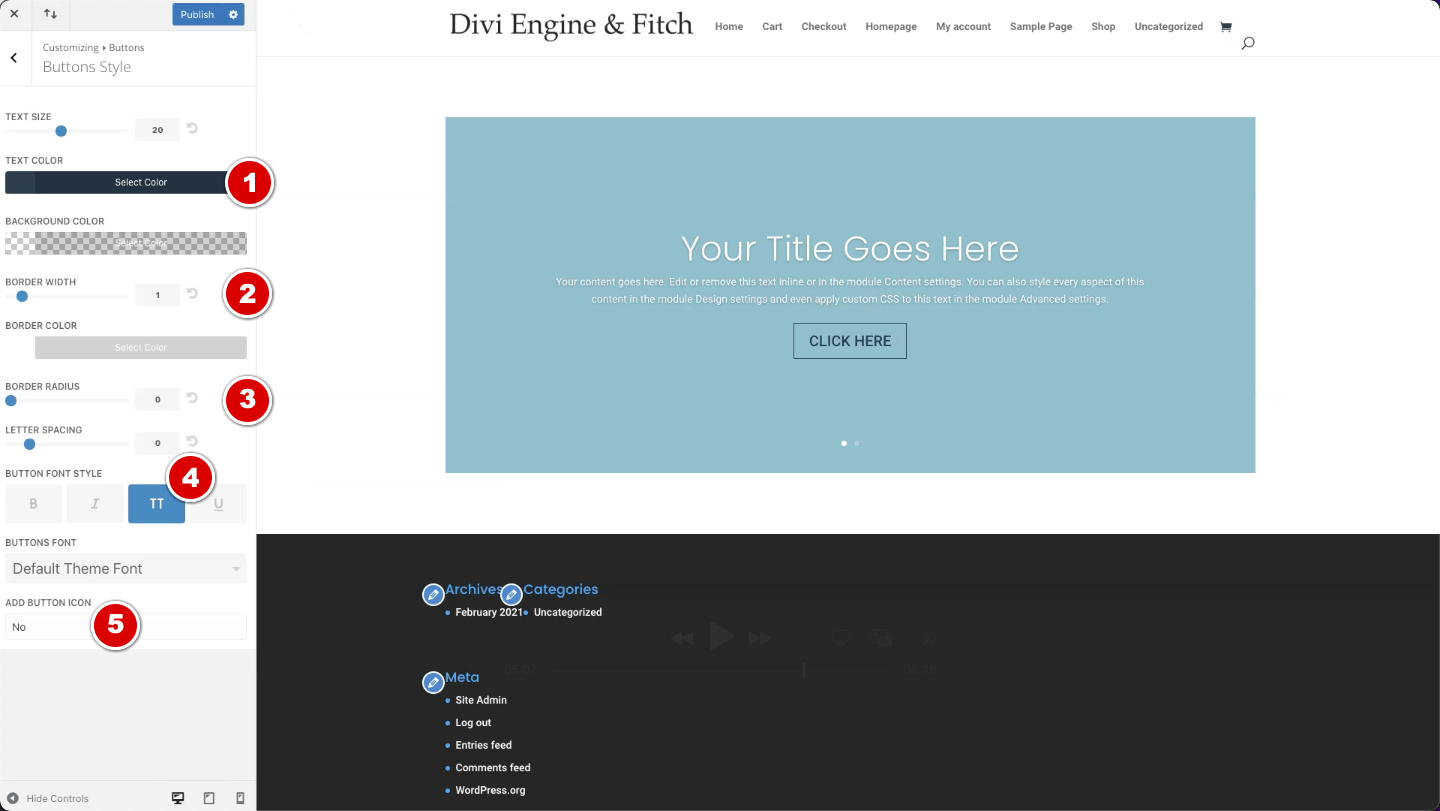
Head to General Settings > Buttons > Button Style
TEXT COLOR > Dark Blue (remember we set this to our palette earlier)
BORDER WIDTH > 1px
BORDER RADIUS > 0px
BUTTON FONT STYLE > TT (Capitalize)
ADD BUTTON ICON > No
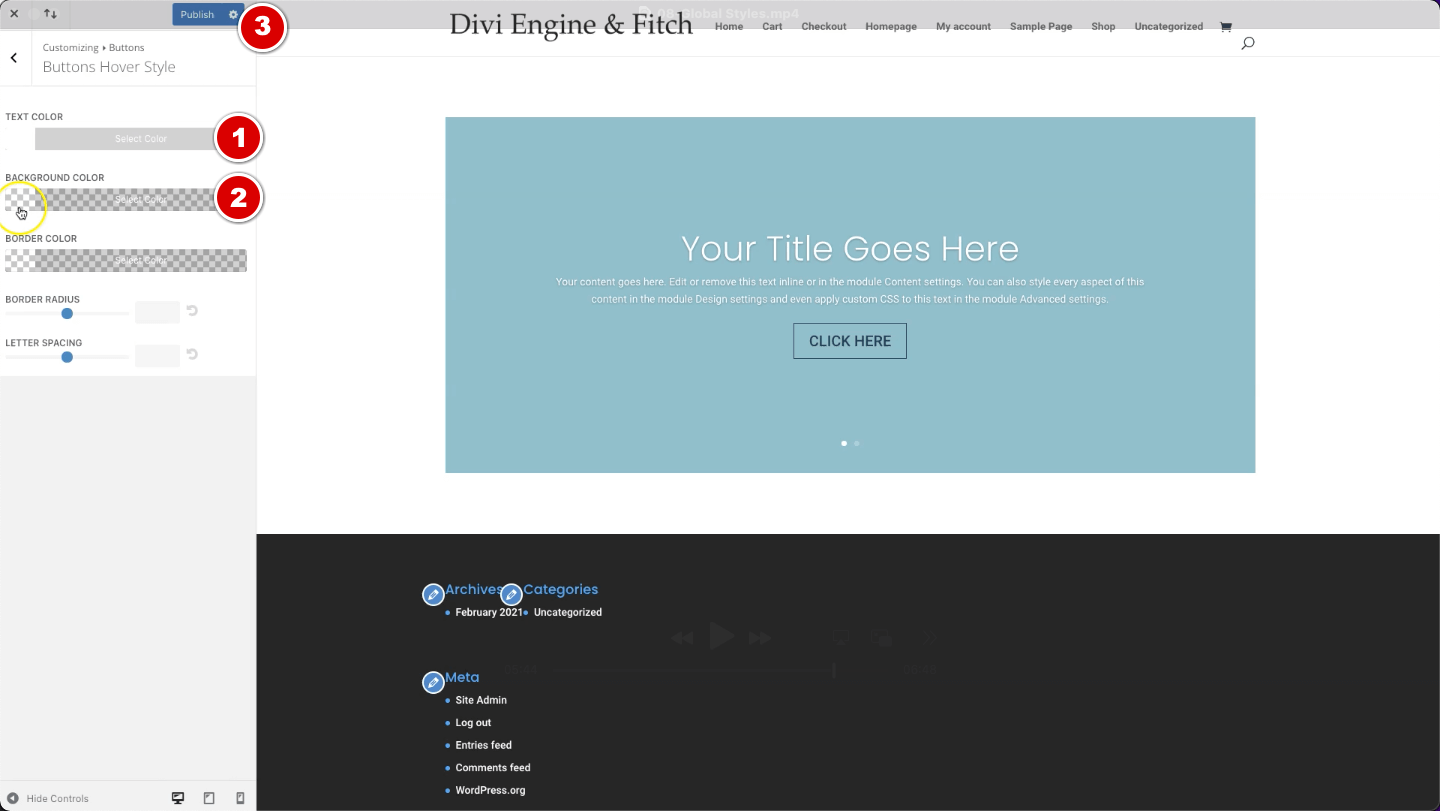
Hover Button Style
Head to General Settings > Buttons > Button Hover Style
TEXT COLOR > White
BACKGROUND COLOR > Dark Blue (remember we set this to our palette earlier)
Publish
Good job team, the groundwork has been laid…
Conclusion
Great job, you! All the groundwork for the next steps is all done. In Part 2 of our How to Clone Any Online Store Tutorial Series, we will start getting to the fun stuff where we start replicating the general design of the Abercrombie & Fitch site in Divi.
Definitely head to our Youtube Channel and subscribe to make sure you don’t miss a single thing because this is going to be valuable for you and your design agency!
Catch you folks next week!








Really great content and series. Found my Divi go-to resource for my e-commerce website.
Thanks!